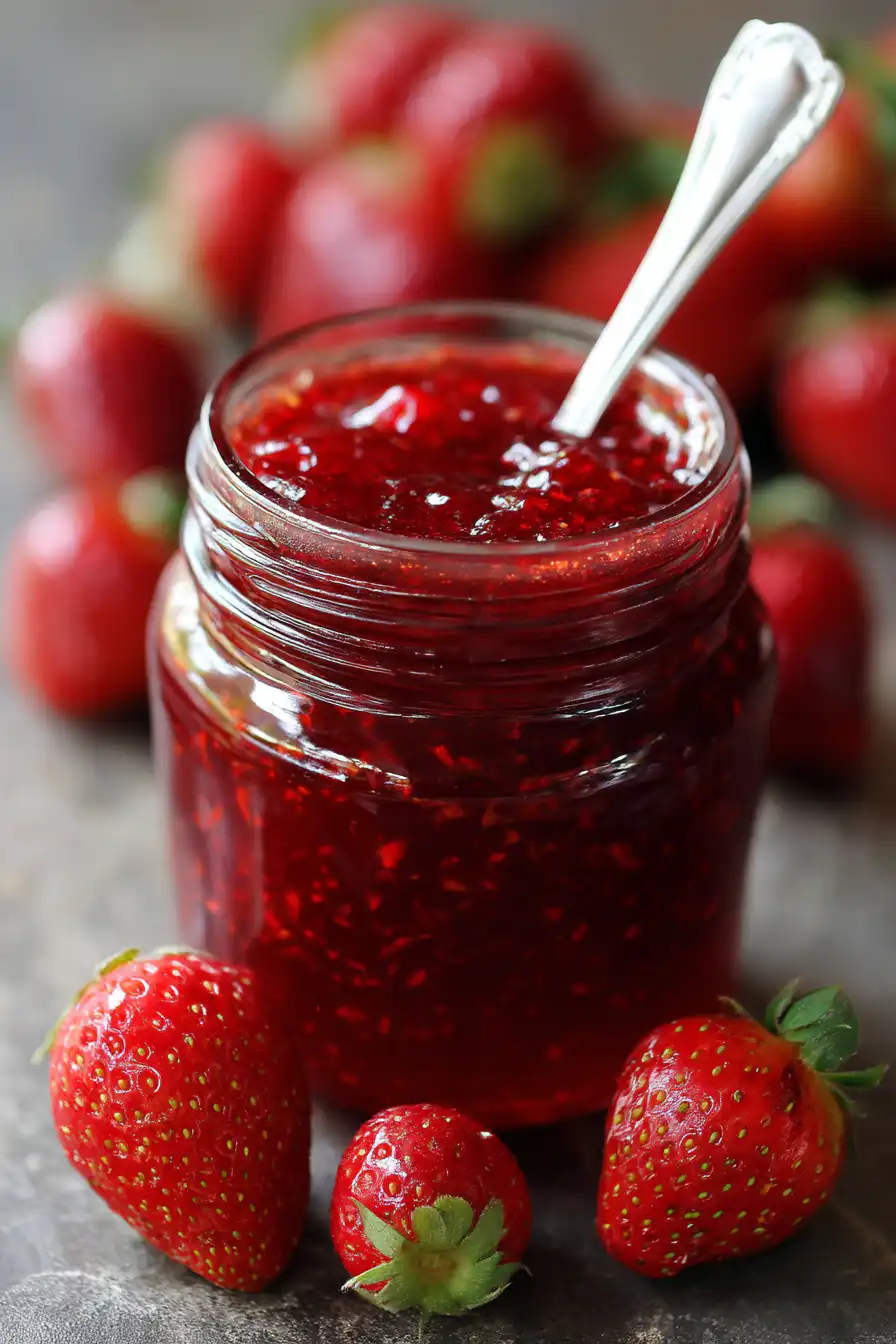
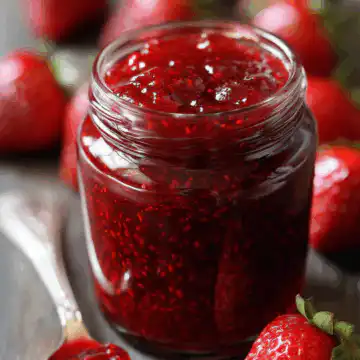
Homemade strawberry jam is such a yummy treat that brings the sweet, ripe flavor of strawberries right into your kitchen. It turns those fresh berries into a spread that really bursts with flavor. This classic favorite isn't just a way to keep the summer taste going; it also gives a nice kick to your breakfast, desserts, or even some savory dishes. Its popularity goes on through generations, so lots of people and cooks still love it even today. You can spread it on toast, add a dollop on pancakes, or even mix it into pastries for a fun flavor twist.
Making strawberry jam at home has a whole lot of benefits that go way beyond what you get at the store. The biggest plus is the super fresh taste you get when you use strawberries you picked yourself or got from a local farm. Also, when you make it by yourself, you get to choose exactly what goes in it - like organic berries, just the right amount of sugar, or even mix in some cool extra flavors. And honestly, there is nothing like the pride you feel when you made something tasty all by your own hands. It's easy, fun, and a great way to enjoy the very best of summer strawberries in every spoonful.

What is Strawberry Jam?
Strawberry jam is a sweet, yummy spread made from fresh strawberries, sugar, and pectin, which is a natural thickener. When you cook these together, you end up with a thick, shiny mix thats perfect for spreading on toast or even filling pastries. Unlike jelly, which is made from only fruit juice and is kinda clear, strawberry jam has the whole fruit in it, giving it a chunky texture and bold taste. Preserves are similar too, but they usually have bigger bits of fruit floating around in the mix.
The history of strawberry jam goes back many years, when people figured out that putting fruits in sugar made them last longer. Back then, it was really helpful for keeping strawberries edible after their short season. Now, with better canning methods and more love for homemade treats, strawberry jam is still a kitchen staple because of its bright flavor and loads of ways it can be used.
Ingredients for Homemade Strawberry Jam
Making your own strawberry jam only needs a few simple ingredients:
- Fresh strawberries: These are the main ingredient, best when picked right at the peak of ripeness so they taste the best.
- Granulated sugar: This is needed for sweetness and to help preserve the jam.
- Pectin: A natural thickener that helps the jam set right. If you want less sugar, you can use low-sugar pectin too.
- Lemon juice: This adds a bit of tartness to balance the sweetness and helps keep the jam fresh longer.
It's really important to use fresh, ripe strawberries to get the best taste and texture. Strawberries that are too ripe might make the jam too sweet, and ones that are not ripe enough can ruin both the color and flavor. You might also try out extra options like herbs or spices for a new twist, like a little basil or a pinch of cinnamon.
Equipment Needed
To whip up some homemade strawberry jam, you will need these basic tools:
- Jars and lids: Pick out some glass jars that seal up tight, like mason jars or canning jars.
- Cooking pots: Use non-reactive pots, such as stainless steel or enamel-coated ones, so nothing weird happens with the chemicals.
- Utensils: You'll need measuring cups, spoons, and a spatula to mix and measure ingredients correctly.
- Optional tools: A funnel can help pour the jam into the jars and canning tongs are great for handling the hot jars safely.
Step-by-Step Recipe for Homemade Strawberry Jam
Directions
Preparation of Ingredients
Start by giving your strawberries a good wash under cool water. Remove the green tops by cutting them off with a knife or a tool made for hulling, making sure all the stems and leaves are tossed out so your fruit base is clean.
Mashing the Strawberries
After hulling, put the strawberries in a big bowl. Use a potato masher or even a fork to mash them up gently. Depending on how chunky you like your jam, mash them until you get that perfect texture; some of you might like it a bit chunky while some may like it super smooth.
Making the Jam
In a big pot, mix together the mashed strawberries, granulated sugar, and pectin. Stir it well so the pectin spreads out evenly. Put the pot on a medium heat and stir it now and again until it gets to a rolling boil. You gotta watch it closely cause it can bubble over real quick. Let it boil for about 1-2 minutes, then do a test with a spoon or drop a bit onto a cold plate to see if it holds its shape. This tells you if the jam is thick enough.
Jarring the Jam
While the jam is cooking, get your jars ready by sterilizing them in boiling water for about 10 minutes. Carefully take the jars out and place them on a clean towel. Once the jam has reached the right thickness, pour it into the hot jars, leaving roughly ¼ inch of space at the top. Wipe the rims with a clean cloth to remove any spillover, then put the sterilized lids on and screw them on tight.
Cooling and Storing
After you've sealed the jars, let them cool off at room temperature. You might hear some popping as they seal, which usually means things are working right. Once cooled, check all the lids by pressing down in the middle; if they don't pop back, it means the vacuum seal is good. Store these sealed jars in a cool, dark spot. For any jars you open, keep 'em in the fridge and try to eat them up in a few weeks. Unopened jars can last up to a year if stored properly.
Tips for Perfect Strawberry Jam
To get the best strawberry jam ever, keep these ideas in mind:
- Measure ingredients accurately: It's super important to measure your strawberries, sugar, and pectin just right so the jam turns out balanced.
- Use high-quality fruit: Pick ripe strawberries that are free of blemishes because they give you the best flavor.
- Avoid common pitfalls: Don't skip sterilizing your jars, and always watch your cooking so you don't burn the jam.
- Adjust sweetness: Give your jam a taste before sealing, so you can tweak the sugar or pectin if it needs it.
Variations of Strawberry Jam
While the regular strawberry jam is awesome, you might wanna try these cool twists:
- Strawberry-basil jam: Toss in some fresh basil leaves while cooking for a herby fresh flavor.
- Spicy strawberry jam: Try adding some finely chopped jalapeños for a bit of heat; just balance it with a little more sugar if it seems too spicy.
- Strawberry-vanilla jam: Stir in some vanilla extract or even a vanilla bean for a rich, aromatic taste.
Health Considerations
Not only does homemade strawberry jam taste amazing, but it also comes with some good nutrients:
- Nutritional aspects: The jam still keeps a lot of the vitamins and minerals from the strawberries, like Vitamin C and antioxidants.
- Alternatives for sugar: You might use natural sweetners like honey or agave syrup if you're looking for a healthier change.
- Dietary restrictions: Always check ingredient labels if you're cooking for someone with allergies or diet limits.
FAQs Section
1. How long does homemade strawberry jam last?
Homemade strawberry jam can last about a year if its sealed properly and kept in a cool, dark place. Once opened, it's best to keep it in the fridge and use it within around 3 weeks.
2. Can I use frozen strawberries for jam?
Yes, you can use frozen strawberries, but make sure you thaw them and drain off any extra water before mashing them.
3. How can I tell if my jam has set?
You can check if the jam is set by doing the spoon or plate test. If it gets a gel-like look and holds its shape, its set enough.
4. Do I need to process my jam in a water bath?
Processing in a water bath is really recommended if you wanna store the jam for a long time, cause it makes sure everything is safe and sealed tight.
5. What should I do if my jam is too runny?
If your jam turns out too runny, you can put it back in the pot, add a bit more pectin, and boil it again following the same steps until it thickens up nice and good.
Conclusion
This whole process shows why making homemade strawberry jam is so cool and satisfying. It's all about turning fresh fruits into a yummy treat that you can share with friends and family. Trying out the recipe and even adding your own twist makes cooking way more fun, and it might even get you hooked on making more homemade goodies in the future.
Homemade Strawberry Jam
Equipment
- 1 large saucepan
- 1 wooden spoon or spatula
- 1 potato masher optional
- 1 set measuring cups and spoons
- 4 sterilized glass jars with lids
- 1 funnel optional
Ingredients
- 2 pounds fresh strawberries, hulled and quartered Use fresh strawberries for the best flavor; frozen strawberries may alter the consistency.
- 2 cups granulated sugar
- ¼ cup lemon juice, freshly squeezed
- ½ teaspoon vanilla extract Optional.
- 1 packet pectin Optional, for thicker jam.
Instructions
- Wash the strawberries thoroughly. Remove the green tops and quarter them. Place them in a large saucepan.
- Using a potato masher, crush the strawberries to your desired consistency (chunky or smooth).
- Add the granulated sugar and lemon juice to the saucepan with the strawberries. If using pectin for a thicker jam, add it according to the package instructions.
- Over medium heat, stir the mixture until the sugar dissolves completely. Bring the mixture to a rolling boil and let it cook for about 30 minutes, stirring frequently.
- To test the jam's thickness, place a spoonful on a cold plate and let it cool for a minute. If it firms up, it’s ready to jar. If it’s still too runny, continue cooking for a few more minutes.
- Use a funnel to pour the hot jam into sterilized glass jars, leaving about ¼ inch headspace at the top. Wipe the rims of the jars clean and place the lids on securely.
- Let the jars sit at room temperature for 24 hours to seal. Store the jam in the refrigerator or can it for longer preservation.