
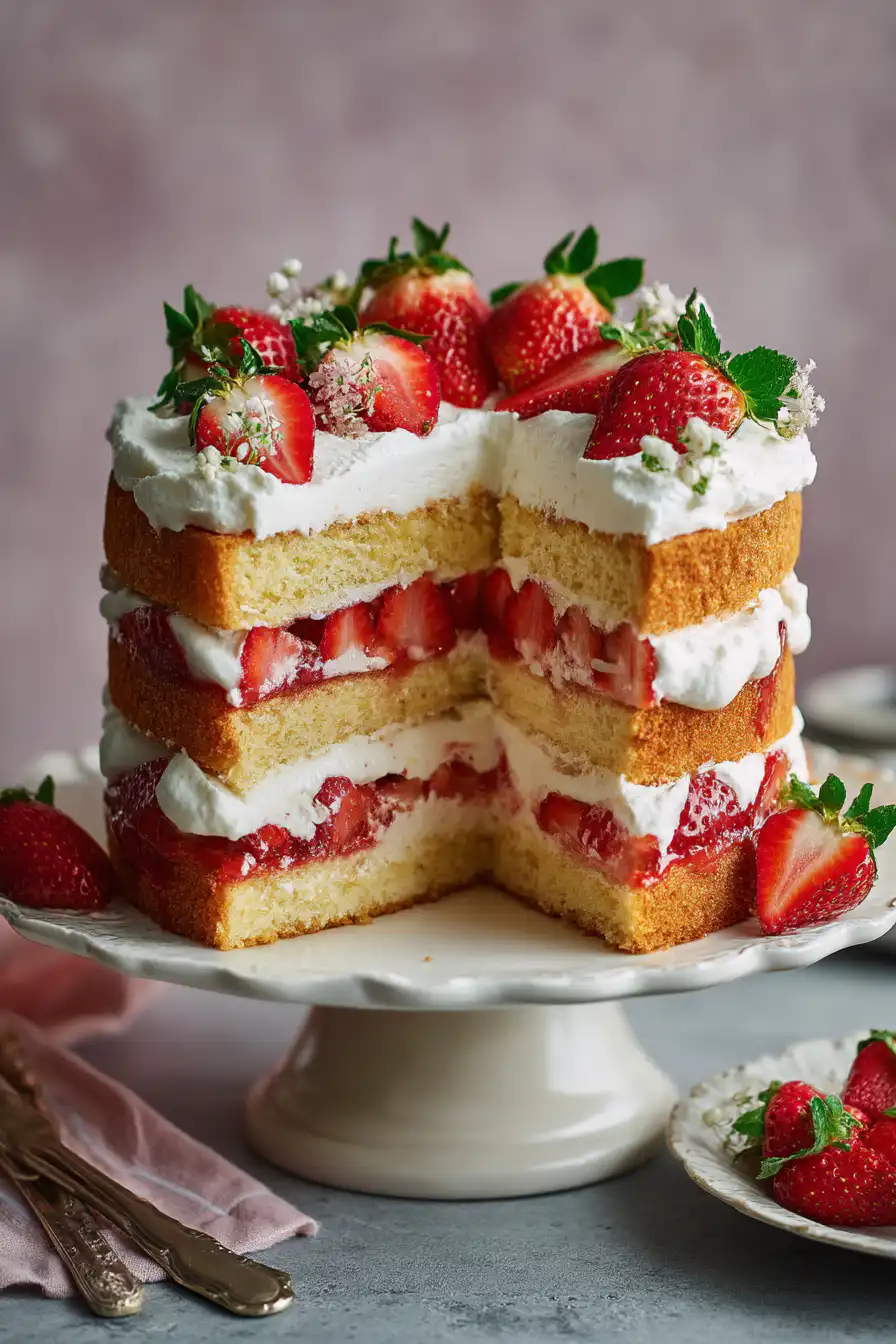
Strawberry shortcake is one of those desserts that really reminds you of summer. Its bright flavors and light texture make it pretty awesome, even though its kinda simple. This treat usually comes with layers of spongy cake or buttery biscuits, stuffed full of fresh strawberries and topped off with whipped cream. The mix of simplicity and freshness is what makes strawberry shortcake a favorite at picnics, barbecues, and family get-togethers over the years. One of the best parts is the sponge cake which soaks up the strawberry juices while still keeping its form, giving you a cool mix of flavors and textures.
The dessert has gotten so popular that every part of the world has its own version, from the old school recipe to new styles that use different fruits, creams, and flavorings. Every region puts its own spin on it, so it keeps changing while still being a go-to treat. In this guide, we will go over the history of strawberry shortcake, look at its main parts, and show you a detailed recipe for making a super tasty Strawberry Shortcake Layer Cake that your friends and family are gonna love. Whether you're just beginning to bake or you're already a pro, the perfect strawberry shortcake is waiting for you!

History of Strawberry Shortcake
The roots of strawberry shortcake go back to the early 19th century in America. Its very first known appearance was in some old British cookbooks where it was called "strawberry cake." But it really came to life when Americans added biscuits or sponge cake and fresh strawberries into the mix. The very first versions didn't have whipped cream, which later became super important.
As American cooking changed over time, so did strawberry shortcake. By the late 1800s, it had gotten really popular, mostly during strawberry season. Recipes popped up in all kinds of regional cookbooks with little changes that showed off local tastes and ingredients. For example, in the South, sweetened biscuits were often used, while up North, people stuck with sponge cake with whipped cream.
Strawberry shortcake isn't just a dessert, it's kind of like a symbol of summer fun. It's usually served at picnics, cookouts, and holiday parties and reminds us of warmth, community, and the sweet taste of seasonal fruit. Over time, lots of variations have come about, like a Japanese "sponge cake" version or other fruity takes, which shows just how adaptable and loved this dessert really is.
Key Components of Strawberry Shortcake
To nail the perfect strawberry shortcake, you gotta know its key parts. Every piece works together to give you the right mix of flavors and textures.
Sponge Cake
Sponge cake is a light and airy dessert made by beating eggs and sugar until it's all foamy, then gently folding in flour and sometimes fat. This gives you a delicate crumb which soaks up strawberry juices without getting too soggy. There are a few kinds of sponge cakes to think about:
- Genoise: An Italian sponge cake thats known for its rich flavor and how well it soaks up other flavors.
- Angel Food Cake: A super light cake made using only egg whites, often served together with fresh fruit and whipped cream.
Strawberries
Fresh, ripe strawberries are the main star of this dessert. Their natural sweetness and juiciness really boost the cake. When you're picking strawberries, look for bits that are deep red and plump without too many spots. It's best to prep them close to serving time for maximum flavor. Some ideas are:
- Rinse the strawberries gently under cold water, then pat them dry before slicing.
- For extra sweetness, try tossing them with a little sugar and lemon juice so they release their natural juices.
Whipped Cream
No strawberry shortcake is complete without a big scoop of whipped cream. There are a few ways to make whipped cream:
- Heavy Whipping Cream: This gives a rich, velvety feel to your dessert.
- Stabilized Whipped Cream: This method uses stuff like gelatin or cornstarch so the cream holds up longer, which is handy when you're serving the cake later on.
To whip up the perfect cream, beat the cream until you see soft peaks, then slowly mix in powdered sugar and vanilla extract. This makes a topping that goes super well with both the strawberries and the sponge cake.
Equipment Needed
You need the right tools to make the best Strawberry Shortcake Layer Cake. Here is a list of what you really should use, plus some extras that can make your baking even easier.
Essential Tools
- Mixing Bowls: Having a few bowls of different sizes is important when you are mixing your ingredients.
- Whisk: A good whisk helps you mix air into your sponge cake and whipped cream.
- Spatula: A spatula is handy for gently folding in your ingredients, especially when mixing the eggy mixture with the flour.
- Cake Pans: Two 8-inch round pans are just right for stacking your layers.
- Cooling Rack: This lets the cake cool evenly after its done baking.
- Electric Mixer: A stand or hand mixer makes whipping cream and blending the cake batter a lot less tiring.
Optional Equipment
- Pastry Brush: It's good for brushing syrup on the cake to keep it moist.
- Offset Spatula: This is great for spreading whipped cream evenly between the layers and for decoration.
- Cake Leveler: It makes sure that your sponge layers are flat and even when you stack them.
Detailed Recipe for Strawberry Shortcake Layer Cake
Ingredients
Sponge Cake Ingredients
- 4 large eggs
- 1 cup granulated sugar
- 1 teaspoon vanilla extract
- 1 ½ cups all-purpose flour
- 1 ½ teaspoons baking powder
- ½ teaspoon salt
- ½ cup unsalted butter, melted
Strawberry Filling Ingredients
- 4 cups fresh strawberries, hulled and sliced
- ¼ cup granulated sugar
- 1 tablespoon lemon juice
Whipped Cream Ingredients
- 1 ½ cups heavy whipping cream
- ½ cup powdered sugar
- 1 teaspoon vanilla extract
Directions
Step 1: Preparing the Sponge Cake
First, preheat your oven to 350°F (175°C). Grease and flour two 8-inch round cake pans or line them with parchment paper so the cake comes out easy. In a large bowl, mix the eggs and sugar. Using an electric mixer, beat them on medium speed until the mix turns pale and fluffy, which takes about 5 minutes. Stir in the vanilla extract.
In another bowl, sift together the flour, baking powder, and salt. Slowly fold the dry ingredients into the egg mix with a spatula, and be sure not to knock out all the air. Then gently fold in the melted butter. Pour the batter evenly into the pans and smooth out the tops with a spatula.
Bake for about 25-30 minutes, or until a toothpick inserted into the center comes out clean. Let the cakes cool in their pans for about 10 minutes before moving them to a wire rack so they can cool completely.
Step 2: Making the Strawberry Filling
While the cakes cool, make the strawberry filling. In a bowl, mix the sliced strawberries, sugar, and lemon juice. Toss them gently so every strawberry gets a little coat of sugar and lemon. Let it sit for about 15-20 minutes so the strawberries can release their juices. If you want a thicker filling, you can cook the mix for a few minutes on medium heat until it looks a bit syrupy, then let it cool down completely. Alternatively, for a more intense flavor, stir in some homemade strawberry jam to the filling.
Step 3: Preparing the Whipped Cream
Take a clean bowl and pour in the heavy whipping cream. Beat on medium speed until you see soft peaks forming, then slowly mix in the powdered sugar and vanilla extract. Keep beating until stiff peaks form. Be careful not to overbeat it or you might end up with butter instead of whipped cream.
Step 4: Assembly of the Cake
Once the sponge cakes are fully cooled, you might want to level the tops if they are uneven. Place one cake layer on a serving plate. Spoon half of the strawberry filling over the top and spread it out evenly. Add a good dollop of whipped cream on top of the strawberries.
Then, carefully put the second layer of cake on top. Repeat the process with the rest of the strawberries and whipped cream, and finish it off with a final layer of whipped cream on the very top. You can keep a few strawberries aside to use as decoration later on.
Step 5: Final Touches
To give your cake a nice look, you can garnish it with fresh strawberries and a few mint leaves if you want. Keep the cake in the fridge until you're ready to serve, as that helps keep it fresh. For the best taste and texture, eat it within 24 hours.
Tips for Success
Here are a few simple hacks to make sure your cake turns out awesome:
- If you live at a higher altitude, you might have to mess around a little with the baking time and temperature.
- To keep your sponge cake moist, try brushing a bit of simple syrup (made by mixing equal parts sugar and water) on the layers before you add the fillings.
- Don't be afraid to try different fruits or flavors - you can swap strawberries with blueberries or peaches, and even add extra flavors like almond or lemon in the whipped cream.
Serving Suggestions
The Strawberry Shortcake Layer Cake is a great centerpiece for lots of occasions. Here are a few ideas on how to serve it:
- It's perfect for summer picnics, barbecues, and family reunions.
- It goes well with drinks like coffee, lemon-ginger iced green tea, or even sparkling lemonade.
- You can slice it into 1-2 inch thick pieces to get the best serving size.
FAQs
What is the difference between strawberry shortcake and strawberry layer cake?
Strawberry shortcake traditionally means using a biscuit or sponge cake with strawberries and whipped cream on top, but a strawberry layer cake has multiple layers of cake with strawberry filling and extra cream in between.
Can I use frozen strawberries instead of fresh?
Yes, you can use frozen strawberries, but they tend to release more water. Make sure you drain them well and maybe adjust the sugar in the filling if needed.
How do I keep the cake from getting soggy?
To stop the cake from getting too soggy, use fresh, dry strawberries and add simple syrup or fruit filling right before serving. Also, don't soak the cake layers too much.
What is the best way to store leftover cake?
If you have leftovers, stick it in an airtight container in the fridge. It's best if you eat it within a couple days while it's still super fresh.
Can I make the sponge cake ahead of time?
Yes, you can make it ahead of time. Just make sure the cake is completely cool before wrapping it tightly in plastic and storing it in the fridge or freezer. Let it come back to room temperature before you assemble it.
Conclusion
All in all, making a Strawberry Shortcake Layer Cake is a really fun process that brings together great flavors and textures. With the right ingredients and a few cool tricks, you can whip up this classic dessert that is sure to bring smiles on any day. Don't be shy to switch it up and add your own twist. We really wanna see your efforts or pictures of your cake, so go ahead and share. Happy baking!

Strawberry Shortcake Layer Cake (Sponge Cake)
Equipment
- 2 8-inch round cake pans
- 1 mixing bowls
- 1 electric mixer
- 1 rubber spatula
- 1 sifter
- 1 measuring cups and spoons
- 1 wire rack for cooling
- 1 whisk
- 1 plastic wrap or cake stand for serving
Ingredients
- 1 cup all-purpose flour
- 1 teaspoon baking powder
- ¼ teaspoon salt
- 4 large eggs
- 1 cup granulated sugar
- ¼ cup whole milk
- ¼ cup vegetable oil
- 1 teaspoon vanilla extract
- 2 cups fresh strawberries hulled and sliced
- 1 cup heavy cream
- ¼ cup powdered sugar
- 1 teaspoon vanilla extract for the whipped cream
Instructions
- Preheat your oven to 350°F (175°C). Grease and flour the two 8-inch round cake pans.
- In a small bowl, sift together the all-purpose flour, baking powder, and salt. Set aside.
- In a large mixing bowl, beat the eggs and granulated sugar together using an electric mixer on medium speed until light and fluffy, about 5 minutes.
- Gently fold in the flour mixture, alternating with the whole milk, vegetable oil, and vanilla extract. Mix until just combined and avoid over-mixing.
- Divide the batter evenly between the prepared cake pans. Bake in the preheated oven for 20-25 minutes or until a toothpick inserted in the center comes out clean.
- Allow the cakes to cool in the pans for 10 minutes, then transfer them to a wire rack to cool completely.
- While the cakes are cooling, prepare the whipped cream. In a mixing bowl, combine heavy cream, powdered sugar, and vanilla extract. Whisk until stiff peaks form.
- Once the cakes are completely cooled, remove the top dome of each cake if necessary to create a flat surface. Place one layer on a serving platter.
- Spread a layer of whipped cream over the first cake layer and top with half of the sliced strawberries.
- Place the second cake layer on top, then spread the remaining whipped cream over the top and sides of the cake. Decorate with the remaining strawberries.
- Refrigerate the cake for about 30 minutes before slicing and serving to allow the flavors to meld.