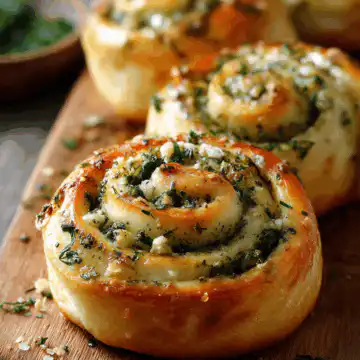
Herb & Garlic Swirl Rolls are pretty cool breads that mix the fresh tastes of herbs with the strong flavor of garlic in a soft roll. These yummy rolls have become a favorite at many dinner tables all over the world. They usually show up at family meals, parties, or any time people get together. The smell of them when they come out of the oven is so inviting that even the fussiest eaters can't help but grab one. The twist in the filling not only makes them taste amazing but also makes them look really nice on the table.
These rolls aren't just tasty - they're super flexible too. You can have them as a starter, a side dish, or even just a snack. Every bite has a mix of flavors that just works so well together. Whether you're enjoying them with a hot bowl of soup, a crisp salad, or as part of a snack plate, they always impress. As we go deeper into the cool history and step-by-step recipe for Herb & Garlic Swirl Rolls, you'll see why so many people love these treats so much.

History of Herb & Garlic Swirl Rolls
The history of Herb & Garlic Swirl Rolls goes back to old school bread-making where different flavors started getting mixed in. Bread has always been important in many cultures, not just for filling you up but also as a way to get creative with tastes. Mixing herbs and garlic in bread shows how people from all over the world have experimented with flavors through time.
Garlic has been important for centuries not only because it tastes great but also for its health perks. Ancient people like the Egyptians, Greeks, and Romans used garlic for strength and longer life, which helped it become a popular ingredient in cooking. Fresh herbs have been used in cooking for a long time too, and they add a lot of flavor and a good smell to foods. Herbs like parsley, thyme, and rosemary are popular because they work well in many recipes and usually make food a bit healthier.
Over time, putting these ingredients together became a big deal, especially in European cooking. Different countries started making their own kinds of herb and garlic breads. This eventually led to the creation of the Herb & Garlic Swirl Roll we know today, which is like a modern twist on these old traditions with its cool swirl and pretty look.
Why You'll Love Herb & Garlic Swirl Rolls
Herb & Garlic Swirl Rolls hit you with a unique flavor combo combining the punch of garlic and the fresh smell of herbs. The taste is a mix that makes every bite feel warm and homemade. When you bite into one, you get that freshly baked bread taste mixed with garlic and herbs that really pops.
These rolls are great for lots of different events, whether it be dinner parties, family dinners, or just a casual get-together. They can easily work as an appetizer, a side, or even a snack. The best part is they can fit in almost anywhere in your meal, no matter if you like it simple or a bit fancy.
Also, the spiral look makes these rolls a cool piece to show off on your table. They not only taste good but look pretty awesome which makes every meal feel special.

Ingredients for Herb & Garlic Swirl Rolls
Making the perfect Herb & Garlic Swirl Rolls begins with having the right stuff. Here is a list of the basics you need to bring these yummy rolls to life.
Main Ingredients
- Flour: Use all-purpose flour to get that soft and fluffy texture.
- Yeast: Active dry yeast or instant yeast works to help the rolls rise.
- Milk: Whole milk or buttermilk makes the dough rich and moist.
- Eggs: Eggs give the dough structure and boost the flavor.
- Butter: Unsalted butter adds a great taste and makes the rolls tender.
Herb & Garlic Filling
- Minced Garlic: Freshly minced garlic gives the rolls that strong, tasty kick.
- Fresh or Dried Herbs: Mix parsley, thyme, or rosemary for a fragrant filling.
- Olive Oil: It helps blend all the filling ingredients and adds moisture.
- Salt & Pepper: They are must-haves to season the filling well.
Optional Ingredients
- Cheese: A little grated cheese like Parmesan or mozzarella can bring an extra richness.
Detailed Recipe for Herb & Garlic Swirl Rolls
Instructions
1. Prepare the Dough
Start by mixing the flour, yeast, salt, and sugar in a big bowl. In another bowl, whisk together the milk, melted butter, and eggs. Then slowly add this wet mix to the dry ingredients, stirring until a dough forms. Then put the dough onto a lightly floured surface and knead it for about 8-10 minutes until it gets smooth and elastic. After that, put the dough in a greased bowl, cover it with a damp cloth, and let it rise in a warm spot for 1-2 hours or until it doubles in size.
2. Make the Herb and Garlic Filling
While the dough is rising, make the filling. In a small bowl mix together the minced garlic, chopped herbs, olive oil, salt, and pepper. Stir it all until its all mixed up into a fragrant paste.
3. Forming the Swirls
After the dough has risen, punch it down then roll it out on a floured surface into a rectangle about ¼ inch thick. Spread the herb and garlic filling evenly all over the dough, but leave a small border along the sides. Starting from one long edge, roll the dough into a tight log. Squeeze the seam closed, then cut the log into equal pieces, around 1 inch thick each.
4. Final Baking Process
Preheat your oven to 375°F (190°C). Place the pieces in a greased baking dish, leaving space between each roll so they can expand. Cover them and let them rise again for about 30 minutes. Then bake in the preheated oven for 25-30 minutes, or until they turn a nice golden brown. When they come out, brush them with melted butter for extra flavor.
Baking Tips
Watch the rolls closely as they bake because every oven is different. They are ready when they have a nice golden color and sound hollow when you tap on the bottom. If you like a softer crust, cover them with a kitchen towel while they cool down.
Serving Suggestions for Herb & Garlic Swirl Rolls
These rolls can make any meal look and taste better. Here are some fun ideas on how to serve them:
- Pair with Soups: Enjoy warm rolls alongside a steaming bowl of soup, which makes the meal even richer.
- Accompany Salads: Their soft texture goes perfectly with a fresh salad, adding a delicious bread side.
- Cheese Platters: Put these rolls on a cheese platter for parties as a tasty match for rich cheeses.
- Dipping Sauces: They are great with sauces like marinara or garlic butter to add more flavor.
Variations of Herb & Garlic Swirl Rolls
Even though the classic Herb & Garlic Swirl Rolls are amazing, you can try different twists on the recipe:
- Cheese-Stuffed Versions: Insert bits of your fav cheese inside them for an ooey-gooey feel.
- Vegan Alternatives: Use plant-based milk, vegan butter, and flaxseed eggs to make a vegan version that still tastes great.
- Gluten-Free Options: Swap in a gluten-free flour blend for those who need to avoid gluten.
Health Benefits of Herbs and Garlic
Adding herbs and garlic to your food not only boosts the flavor but also gives you some great health benefits:
- Nutritional Value of Herbs: Fresh or dried herbs come packed with vitamins, antioxidants, and anti-inflammatory goodies that help keep you healthy.
- Health Benefits of Garlic: Garlic is known to boost the immune system and help the heart because of its high allicin levels.
- Adding Herbs to Meals: Using herbs can help you use less salt while still keeping your food tasty and interesting.
FAQ Section
What is the best way to store Herb & Garlic Swirl Rolls?
To keep these rolls fresh, put em in an airtight container at room temperature for up to 3 days. If you need to store them longer, you can put them in the fridge or freezer. Just reheat them before servin so they taste their best.
Can I freeze Herb & Garlic Swirl Rolls?
Yea, you can freeze them either before or after baking. For best results, freeze them in a single layer on a baking sheet then transfer them to a freezer bag. They can stay in the freezer for up to 3 months.
How long do they last?
If you store them right, Herb & Garlic Swirl Rolls can last up to 3 days at room temperature, about a week in the fridge, or up to 3 months frozen.
What other herbs can I use for the filling?
You can try different herbs like basil, dill, or chives, based on what flavours you like and what you're serving them with.
Can I make the dough ahead of time?
For sure! You can make the dough a day earlier. After kneading, just put it in the fridge instead of letting it rise right away. The next day, let it come to room temperature and rise before you roll and bake it.
Conclusion
Herb & Garlic Swirl Rolls are an awesome treat that mixes deep flavors and that comforting taste of freshly baked bread. They work for lots of different meals and events and you can even try adding your own twist to them. Give the recipe a shot, have fun with it, and don't be surprised if everyone asks for more!
Herb & Garlic Swirl Rolls
Equipment
- 1 mixing bowl
- 1 measuring cups and spoons
- 1 rolling pin
- 1 baking sheet
- 1 parchment paper
- 1 kitchen towel
- 1 toothpick or skewer (optional for testing)
Ingredients
- 4 cups all-purpose flour
- 1 packet (2 ¼ tsp) active dry yeast
- 1 cup warm milk 240ml
- ⅓ cup granulated sugar 70g
- ¼ cup unsalted butter, melted 60g
- 2 large eggs
- 1 teaspoon salt
- 3 cloves garlic, minced
- ¼ cup fresh parsley, chopped 15g
- ¼ cup fresh basil, chopped 15g
- ¼ cup grated Parmesan cheese 25g
- 1 teaspoon dried oregano
- ½ teaspoon black pepper
Instructions
- In a mixing bowl, combine warm milk, yeast, and sugar. Let it rest for about 5 minutes until frothy.
- In another bowl, mix the flour and salt. Once the yeast is ready, add the melted butter, eggs, and the flour mixture to the yeast mixture. Stir until well combined.
- Knead the dough on a floured surface for about 8-10 minutes until it’s smooth and elastic. Place the dough in a greased bowl and cover it with a kitchen towel. Let it rise in a warm place for 1 hour or until doubled in size.
- Once the dough has risen, punch it down and roll it out into a rectangular shape, about ½ inch thick.
- In a small bowl, mix minced garlic, chopped herbs, Parmesan cheese, oregano, and black pepper.
- Spread the herb and garlic mixture evenly over the rolled dough. Starting from one long side, roll the dough tightly into a log.
- Cut the log into 12 equal pieces and place them on a baking sheet lined with parchment paper. Cover with the kitchen towel and let them rise for another 30 minutes.
- Preheat the oven to 375°F (190°C). Bake the rolls for about 20-25 minutes or until golden brown.
- Remove from the oven and let them cool slightly before serving.