
Rice Krispie Treats have been a favorite dessert in America since the 1930s. They were first created to help promote Kellogg's crispy rice cereal. Over the years, these treats went from being simple squares to lots of different shapes and flavors that everyone seems to love. Now, they're a go-to snack in many homes, especially during holidays like Easter. The mix of marshmallows, butter, and Rice Krispies makes a sweet, crunchy base that you can easily change up for any occasion.
Easter is all about celebration, family get-togethers, and yummy snacks. Treats that match the theme of the holiday are important because they represent new beginnings and happiness. When everyone gets together to celebrate, the sweets match the cheerful mood. Easter Rice Krispie Treats, with their bright colors and fun decorations, have become a big hit for not just how they look but also how they taste. They're a cool way to add a little creativity to your Easter party, whether you're sharing them with family or giving them as a gift to your buddies. For more sweet ideas, explore our collection of Easter candy recipes that capture the holiday spirit.
Lately, there has been a lot of new ideas for how to decorate or even add flavor to Rice Krispie Treats. Bakers and fans alike are trying to make their Easter treats extra special. You might see pastel colored treats or ones decorated with little chocolate bunnies and sprinkles. There really is no limit. As you get ready for the holiday, try some new trends and tricks that can turn your Easter Rice Krispie Treats into the star of the show. Get set to surprise your friends and fam with a new twist on this old favorite!

Introduction to Easter Rice Krispie Treats
Rice Krispie Treats have been a favorite dessert in America since they wer first invented in the 1930s. They were made at first to promote Kellogg's crispy rice cereal. Through the years, these treats have changed from the basic square shape into many fun variations that appeal to all ages. Now, they're a common snack in many homes, especially when it's Easter time. The mix of marshmallows, butter and Rice Krispies gives a sweet and crunchy treat that can be changed up easily for any holiday.
Easter is a time full of celebrations, family meet-ups, and of course, tasty treats. The special meaning behind Easter desserts has to do with rituals that show new beginnings and happiness. As families unite to celebrate this season they often share foods that remind them of the joy around them. Easter Rice Krispie Treats, with their bright colors and fun decorations, have become all the more popular because they look cool and taste great. They are a nifty way of adding a splash of creativity to your Easter party, either as a dessert for a family shindig or a gift for friends.
These days, people have been thinking of inventive ways for decorating and adding flavors to Rice Krispie Treats. Whether it's using pastel colors or topping them with chocolate bunnies and sprinkles, there really are endless ideas. As you plan your Easter festivities, try exploring some fresh trends and ideas that can make your Easter Rice Krispie Treats the highlight of the day. Prepare yourself to wow your family and friends with a delicious spin on this classic snack!
Ingredients for Easter Rice Krispie Treats
To make some yummy Easter Rice Krispie Treats, you'll need a few main ingredients and some extra festive goodies to make them extra fun.
- Essential Ingredients
- Rice Krispies cereal
- Marshmallows
- Butter
- Optional Festive Add-Ins
- Food coloring (for pastel colors)
- Sprinkles (Easter themed)
- Chocolate eggs or bunnies (for decoration)
You also gotta have a few tools to make the process easier:
- Tools You'll Need
- Mixing bowl
- Spoon or spatula
- Baking dish
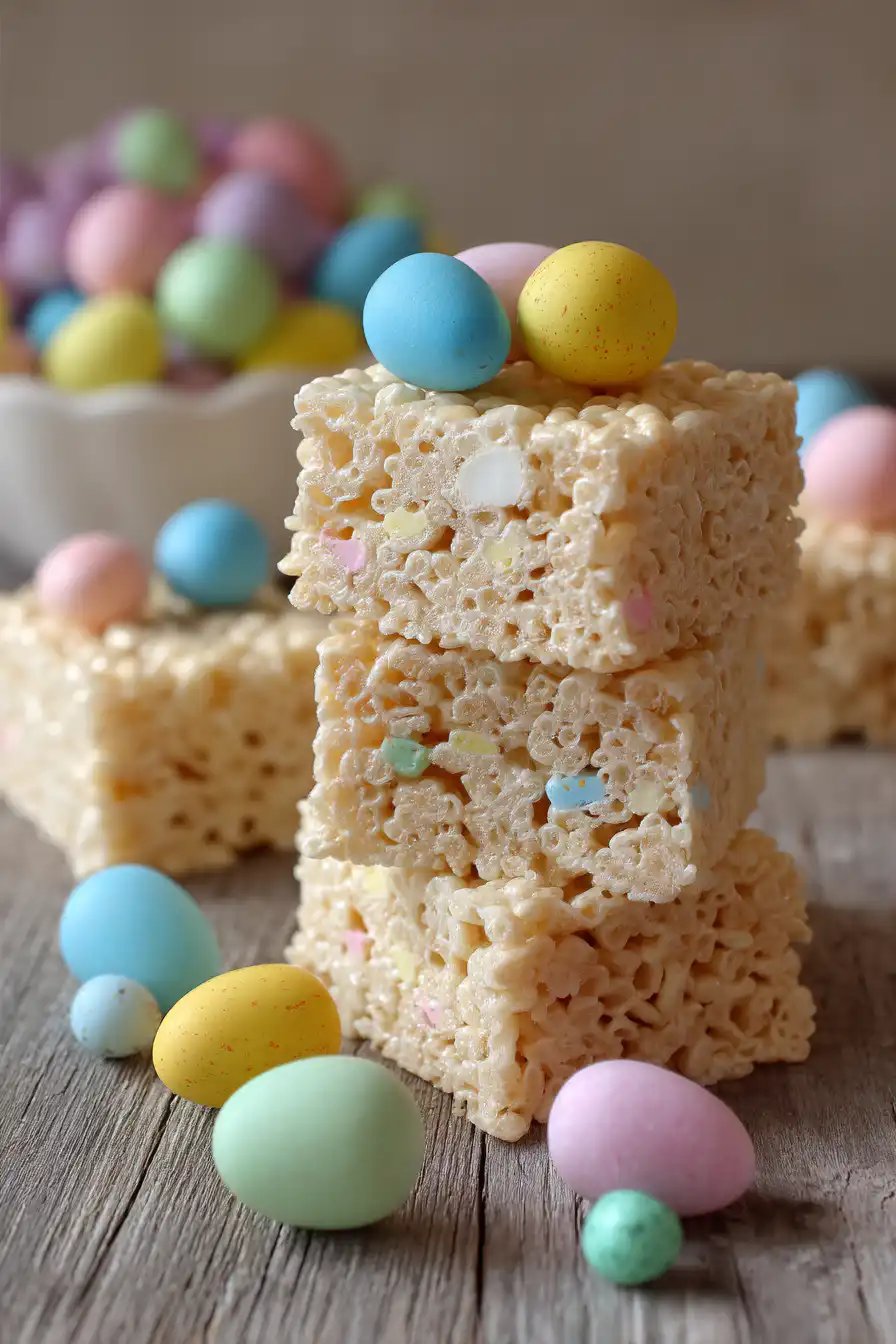
Step-by-Step Recipe for Easter Rice Krispie Treats
Making Easter Rice Krispie Treats is fun and easy once you get all your stuff together. Follow these steps and you'll have awesome treats in no time.
Preparation Time
Preparation Time: 15 minutes
Cooking Time
Cooking Time: 10 minutes
Setting Time
Setting Time: 30 minutes
Yields
Yields: 16 servings
Directions
Here are some simple steps to create your Easter Rice Krispie Treats:
- Prepare the Dish: Grease a 9x13 inch baking dish lightly using non-stick cooking spray or some butter. This makes it easier to get the treats out later.
- Melt the Butter: In a big saucepan over low heat, melt the butter completely. Make sure you dont let it get too brown.
- Add Marshmallows: Toss the whole bag of mini marshmallows into the pan with the melted butter. Stir them constantly until all the marshmallows are completely melted and smooth.
- Mix in Rice Krispies: Take the saucepan off the heat and slowly add the Rice Krispies cereal while stirring until every piece is coated evenly.
- Add Food Coloring and Optional Mix-Ins: If you want, put in a few drops of food coloring to get some pastel hues. You can also stir in some Easter sprinkles or little chocolate eggs for extra taste and color.
- Press into Baking Dish: Pour the mix into your greased dish. With a spatula or even some wax paper, gently press it down so it's even all over. Try not to pack it too tight so it stays light and chewy.
- Allow to Set: Let the treats chill at room temperature for about 30 minutes or until they are firm enough.
- Decorating the Treats: Once firm, cut the Rice Krispie treats into squares. Then, you can top them with chocolate eggs and additional sprinkles to make them look extra festive.
Creative Variations on Easter Rice Krispie Treats
After you master the basic Easter Rice Krispie Treats, you might want to try some cool variations to mix it up. Here are some fun ideas to make your treats even more interesting:
- Chocolate Rice Krispie Treats: Add cocoa powder or toss in some chocolate chips while melting the marshmallows for a yummy chocolate flavor that's sure to be a hit.
- Flavored Rice Krispie Treats: Switch it up by using flavored marshmallows, like strawberry or vanilla, to give your treats a new twist.
- Healthy Alternatives: If you're looking for something a little healthier, try using brown rice cereal or natural sweeteners. You can also mix in a dollop of nut butter for a nuttier, richer taste.
- Layered Treats: Get creative by making layers. You could do alternating layers of chocolate and vanilla, or even mix in some fruit-flavored cereal for extra color and flavor.
Tips for Perfect Easter Rice Krispie Treats
To make sure your Easter Rice Krispie Treats come out perfect every time, check out these handy tips:
- Best Practices to Avoid Sticking: Use fresh marshmallows because the older ones can cause the treats to be extra sticky. Also, don't forget to grease your pan really well.
- Achieving the Ideal Texture: Press the mixture into the pan gently and avoid packing it too tightly so it keeps a light and chewy feel.
- Storing Treats for Optimal Freshness: Keep your treats in an airtight container. This helps them stay fresh longer and stops them from turning hard.
- Making Ahead: Tips and Storage: You can easily make these treats a day before your event. Just store them right so they keep their freshness until it's time to serve.
Importance of Presentation: Serving Easter Rice Krispie Treats
The way you present your Easter Rice Krispie Treats can make them look even more awesome. Here are some ideas on how to serve these treats:
- Professional Plating Techniques: Put the treats on colorful platters or use tiered stands. This not only makes them look pretty but also gives your table some height and style.
- Ideas for Serving at Easter Gatherings: Think about placing these treats next to other festive goodies like cupcakes or cookies so you get a fun dessert spread.
- Fun Ways to Package as Gifts or Favors: Wrap each treat in clear cellophane bags and tie them with pastel ribbons. This makes a sweet little gift that friends and family will really enjoy!
FAQs about Easter Rice Krispie Treats
Below are some common questions that might come in handy when you make Easter Rice Krispie Treats:
- What are Easter Rice Krispie Treats? These treats are just like the regular Rice Krispie Treats but with a festive twist of colors and decorations to match the Easter theme.
- How long do Rice Krispie Treats last? Generally, they last around 3-5 days if you keep them in an airtight container at room temperature.
- Can I make Rice Krispie Treats in advance? Yes, you can make them a day or two ahead and store them properly so they still taste fresh when it's time to eat.
- Can these be made gluten-free? Definitely! Just make sure you use gluten-free Rice Krispies and check all the ingredient labels to be safe.
- How do I store leftover treats? Leftovers should be kept in an airtight container in a cool, dry spot to stop them from getting hard or stale.
Conclusion
Whipping up Easter Rice Krispie Treats is a really fun way to celebrate the holiday with those you care about. There are endless ways to get creative with them, making these treats a perfect addition to any Easter party. So, have fun trying out new ideas and sharing your tasty treats with family and friends! Don't forget to browse our list of other festive Easter treats to round out your dessert table.
easter rice krispie treats
Equipment
- 1 large mixing bowl
- 1 medium saucepan
- 1 wooden spoon or spatula
- 1 9x13 inch baking pan
- 1 parchment paper (optional)
Ingredients
- 3 tablespoons unsalted butter
- 1 package (10 oz) marshmallows Alternatively, use 4 cups mini marshmallows.
- 6 cups Rice Krispies cereal
- as needed drops food coloring Optional, for coloring the marshmallows.
- 1 cup pastel-colored M&Ms or sprinkles For decoration.
Instructions
- Prepare your baking pan by greasing it lightly with butter or lining it with parchment paper for easy removal.
- In a medium saucepan, melt the unsalted butter over low heat. Once melted, add the marshmallows.
- Stir the marshmallows continuously until they are completely melted and smooth. If desired, add a few drops of food coloring to create a festive look.
- Remove the saucepan from heat and immediately add the Rice Krispies cereal. Gently mix until all the cereal is well coated with the marshmallow mixture.
- Fold in half of the pastel M&Ms or sprinkles into the mixture for added color and fun.
- Pour the mixture into the prepared baking pan and press it down evenly with your hands or a spatula (but be careful, it may be hot!).
- Allow the treats to cool completely at room temperature. Once cooled, cut them into squares and decorate with the remaining M&Ms or sprinkles on top.