
Satisfying a sweet tooth has always been something people look forward to, and Buckeye treats really hit the spot, especially if you're into that classic mix of chocolate and peanut butter. Originating from Ohio, these treats look like the nut from a Buckeye tree and have built up a bunch of fans thanks to their rich flavor and easy prep. With a crumbly chocolate shell around a smooth peanut butter center, it's no wonder they've become a symbol of comfort and celebration.
This article is all about a cool spin on the usual Buckeye treat: No-Bake Buckeye Cheesecake Bars. They're great for anyone who wants a fancy dessert without dealing with an oven. These bars mix the well-loved Buckeye flavors with the creamy taste of cheesecake. The result is a fun mix that both chocolate and peanut butter fans will dig, and the best part is they are super easy to whip up.
In the next parts of this write-up, you'll read about no-bake desserts in general, learn a bit about Buckeyes and their history, and get a step-by-step recipe for making your own No-Bake Buckeye Cheesecake Bars. There's even tips to help you get it just right along with cool ideas on how to serve them. So get ready to wow your friends and family with a dessert that's not only a piece of cake to make but also crazy delicious!
I. Understanding No-Bake Desserts
No-bake desserts are awesome because they don't need an oven and take really little time to make. They are basically sweets that firm up in the fridge or freezer instead of baking in a hot oven. This way, you dont have to worry about preheating your oven or watching the clock to keep an eye on baking times. They come in many textures like creamy or crunchy, and there is something yummy for every sweet tooth.
The biggest win with no-bake desserts is that they are great when youre short on time or want to keep cooking simple. They usually take way less time to prepare, which is perfect for busy days or when you have unexpected guests. Plus, no-bake treats can be a lifesaver for beginners who might get stressed out by complicated baking recipes.
One reason these treats are getting more popular is that they are super convenient. A lot of no-bake desserts are also light and refreshing which is perfect on hot days, so you can enjoy something sweet without heating up the whole kitchen. Common types include cheesecake, layered mousse, and icebox cakes. Even though they are all different, they share the fact that they're easy to make and really satisfying, so they're always a hit among dessert fans.
II. What Are Buckeyes?
Buckeye candies are a special treat with deep roots in Ohio and a big part of the state's culinary tradition. They started out in the late 1800s when the candy making scene in Ohio was on the rise. They got their name from the Buckeye tree because the candies look kinda like the tree's nuts. With a mix of chocolate and peanut butter, these sweets have become super popular all over the united states and are a must-have during holidays, celebrations, and family get-togethers.
The main ingredients for Buckeye candies are super simple but really important: smooth peanut butter, rich semi-sweet chocolate, and powdered sugar. Usually, you roll the peanut butter mix into little balls and then dip them in chocolate. This makes them look cool and taste even better.
Mixing Buckeye flavors with cheesecake is a match made in heaven since both have a rich, creamy vibe. The cheesecake's smooth texture goes perfectly with the nutty peanut butter and chocolate's slight bitterness. This mix not only keeps the classic Buckeye taste alive but also adds an extra creamy layer thats just irresistible. The contrast between the smooth filling and crunchy base makes a dessert thats both pretty to look at and really yummy.

III. Overview of No-Bake Buckeye Cheesecake Bars
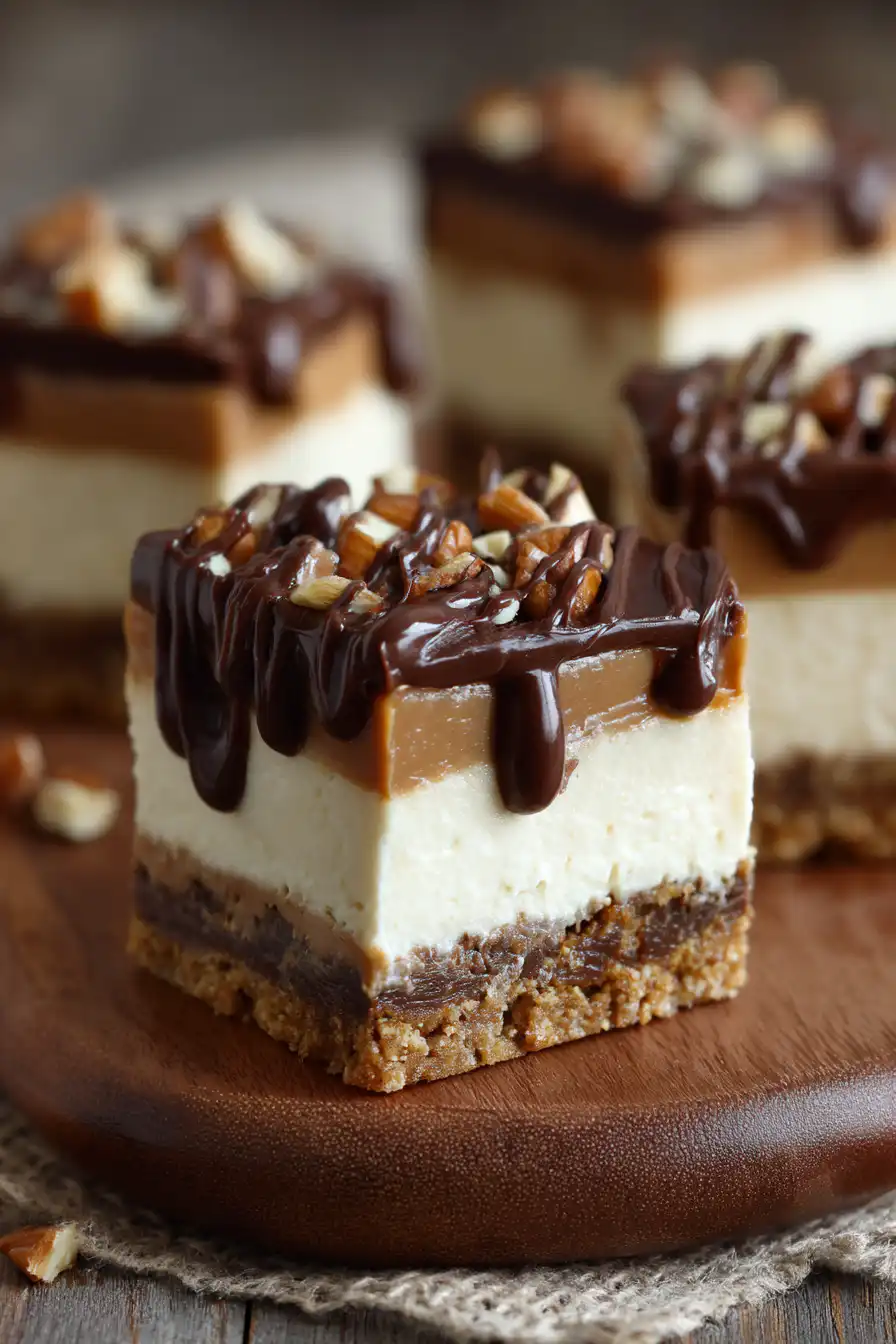
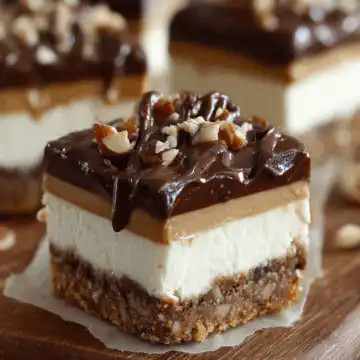
No-Bake Buckeye Cheesecake Bars perfectly mix flavors and textures by combining the classic tastes of chocolate and peanut butter with the rich creaminess of cheesecake. These bars look great and taste even better, making them awesome for parties, potlucks, or just a nice family dinner. The layers of creamy filling on a crunchy crust creates a treat thats sure to win over both kids and adults.
They are cool 'cause they can be served almost anywhere, from casual family dinners to festive get-togethers. Since there's no baking involved, you can make them ahead of time and then just chillax while they set. Every bite offers a perfect portion of flavors, letting you experience your favorite Buckeye treats in a whole new way.
On the health side, these cheesecake bars can be tweaked to fit different diets. If you need a gluten-free version, you can change the crust to gluten free graham crackers or try other flours. There's even options to reduce the sugar, making these bars a more friendly treat for nearly everyone.
IV. Recipe for No-Bake Buckeye Cheesecake Bars
A. Ingredients
- Crust:
- 1 ½ cups graham cracker crumbs
- ½ cup unsalted butter, melted
- ¼ cup sugar
- Filling:
- 8 oz cream cheese, softened
- ½ cup creamy peanut butter
- ½ cup powdered sugar
- 8 oz whipped topping or homemade whipped cream
- Topping:
- 1 ½ cups semi-sweet chocolate chips
- 2 tablespoon vegetable oil or coconut oil
B. Directions
1. Prepare the crust.
In a medium bowl, mix together the graham cracker crumbs, melted butter, and sugar until it becomes crumbly and sticks together a bit. Then press this mix evenly into the bottom of a greased 9x9-inch pan - this forms a solid base for the cheesecake layer.
2. Make the filling.
In a large bowl, use an electric mixer to beat the softened cream cheese until it becomes smooth. Now stir in the creamy peanut butter and powdered sugar until everything is well blended and a bit fluffy. Gently fold in the whipped topping or the homemade whipped cream so it stays light and airy.
3. Layer the filling on the crust.
Spread the peanut butter cheesecake filling all over the crust. Use a spatula to smooth it out nice and even.
4. Prepare the chocolate topping.
Take a microwave-safe bowl and combine the semi-sweet chocolate chips with the vegetable oil. Microwave it for about 30 seconds at a time and stir after each session until the chocolate is completely melted and smooth. Then pour it on top of the cheesecake layer and spread it out evenly.
5. Chill and serve.
Put the whole dish in the fridge for at least 4 hours or even overnight so it sets up properly. Once it's set, cut the dessert into squares and serve it chilled for the best taste!
C. Tips for Perfecting the Recipe
- You can change it up by trying a chocolate crumb crust instead of the standard graham crackers or toss in some chopped nuts for that extra crunch.
- Keep your bars fresh by storing them in an airtight container in the fridge for up to a week, or even freeze them if you want to save some for later.
- If you have any dietary issues, you can use dairy free cream cheese and whipped topping, or even try different sweeteners.
V. Serving Suggestions and Variations
A. Presentation Ideas
For a cool look, try getting creative with how you plate the dessert. You could drizzle some melted chocolate on the serving plates, top the bars with a bit of whipped cream and a sprinkle of crushed peanuts or chocolate shavings. Serving them up with fresh berries also adds a pop of color and a nice tangy taste.
B. Flavor Variations
If you wanna mix things up, try adding flavor twists. For example, mixing some crushed Oreos into the crust creates a yummy chocolate base. You could also swirl in a bit of caramel or even sprinkle some crushed peanuts on top before serving for extra crunch and flavor.
C. Pairing Recommendations
These bars go really well with drinks like coffee, chocolate milk, or even a cold glass of vanilla almond milk. If you wanna go all out, serve a scoop of vanilla ice cream beside the cheesecake squares for an extra rich treat that people are sure to love.
VI. FAQs
A. Can I make this recipe gluten-free?
Yes! You can make a gluten-free version by swapping out the graham cracker crumbs with gluten-free graham crackers or even using ground almonds or almond flour.
B. How long does the Buckeye cheesecake keep?
If you store the bars in an airtight container in the fridge, they will last for about a week. If you freeze them, they can last up to two months.
C. Can I use natural peanut butter?
You can use natural peanut butter but it might change the texture a little bit and be less creamy than the regular type. Still, it gives a stronger peanut taste that works just fine.
D. How do I cut these bars neatly?
To cut the cheesecake bars without a mess, dip a sharp knife in hot water, dry it off fast, and then slice through the dessert. This trick will help you make cleaner cuts through both the chocolate top and cheesecake layers.
E. Can I add other toppings?
Definitely! Besides the chocolate top, you can add things like sprinkles, crushed peanuts, or even a drizzle of caramel to add more flavor and texture.
VII. Conclusion
No-Bake Buckeye Cheesecake Bars mix together all the best flavors into one awesome dessert. They let you enjoy the rich taste of chocolate and peanut butter along with creamy cheesecake, and they are super easy to make for any occasion. Give this recipe a try and don't be afraid to experiment with your own ideas. Enjoy the treat and share your thoughts if you like it!
No-Bake Buckeye Cheesecake Bars
Equipment
- 1 9x13 inch baking dish
- multiple mixing bowls
- 1 electric mixer
- 1 rubber spatula
- 1 measuring cups
- 1 measuring spoons
- 1 parchment paper
Ingredients
- 1.5 cups graham cracker crumbs
- 0.5 cup unsalted butter, melted
- 0.25 cup granulated sugar
- 16 oz cream cheese, softened
- 1 cup powdered sugar
- 0.5 cup creamy peanut butter
- 1 teaspoon vanilla extract
- 1 cup heavy whipping cream
- 1 cup semi-sweet chocolate chips
- 2 tablespoons coconut oil
Instructions
- Line the bottom of a 9x13 inch baking dish with parchment paper, leaving some overhang for easy removal later.
- In a mixing bowl, combine the graham cracker crumbs, melted butter, and granulated sugar. Mix until well combined. Press the mixture evenly into the bottom of the prepared baking dish to form the crust.
- In another mixing bowl, use an electric mixer to beat the softened cream cheese until smooth. Gradually add the powdered sugar while continuing to mix. Then, beat in the peanut butter and vanilla extract until fully combined.
- In a separate bowl, whip the heavy cream until stiff peaks form. Gently fold the whipped cream into the cream cheese mixture until fully combined, being careful not to deflate the whipped cream.
- Pour the cheesecake mixture over the crust in the baking dish, smoothing the top with a rubber spatula. Refrigerate for at least 2 hours until set.
- Once the cheesecake is set, melt the chocolate chips and coconut oil together in a microwave-safe bowl in 30-second intervals, stirring between each, until smooth.
- Pour the melted chocolate over the chilled cheesecake and spread evenly. Return to the refrigerator for an additional 30 minutes to set the chocolate layer.
- Once everything is firm, lift the cheesecake bars from the dish using the parchment paper overhang. Cut into squares and serve.