You catch the smell through the steam vent and suddenly you are starving. That cozy mix of herbs and spices kinda sneaks right into your senses. Your stomach growls and you spot those chicken tenders just waiting for you to come quick and enjoy.

You remember how you threw some nutritional yeast and garlic powder into the mix, making it super tasty but still healthy. The aroma gets stronger and you recall that perfect crispy outside and juicy inside texture you're craving. It's like chicken tenders but way better cause they're gluten free.
You sense the pressure cooker doing its thing, little bubbles dancing and the sealing ring holding tight. Steam cues tell you it's cooking just right. The wait gets hard but you know a dang good meal is nearly ready. Time to get hungry and get ready for the yum.
What Makes Pressure Cooking Win Every Round
- It locks in flavors real good with the sealing ring holding pressure tight.
- Pressure cooks super fast compared to oven or stove way of cooking.
- You get that juicy chicken without drying it out.
- Broth depth matters but you only need a little bit to make it work.
- The slow release option lets the chicken stay tender and moist.
- You notice steam cues helping know when it's near done.
- Natural release finishes cooking without harsh heat or bursts.
The Complete Shopping Rundown
Alright, so grab these from your pantry or market before you start cooking. You're gonna need 4 ½ teaspoons of nutritional yeast flakes. That gives a cheesy flavor without dairy.
Next up, 1 teaspoon dried onion flakes. You can switch to half a teaspoon onion powder if that's what you got. Then don't forget the ¼ teaspoon garlic powder for that punch of garlicky goodness.
You'll want ¼ teaspoon dried parsley and the same amount of dried thyme to add that herby vibe. Just a pinch of kosher salt, about ⅛ teaspoon, is enough to bring the goodness out.
Add a tiny bit of turmeric, also ⅛ teaspoon, just to brighten the color.
For the chicken itself, 1 ½ pounds of skinless, boneless chicken breasts sliced right into tenders. Get ready, cause that's the star here!
Three tablespoons mayo and 1 egg are your wet binders. Season the mix with ¼ teaspoon kosher salt and a dash of black pepper, ⅛ teaspoon fresh ground is best.
For the coating, you'll need ¼ cup superfine white rice flour or a gum-free gluten free flour blend. And don't forget 2 to 3 cups of Panko-style gluten free bread crumbs, it's what's gonna make your tenders crispy.
Finally, have a cooking oil spray ready to help them brown up nicely in the oven after pressure cooking.

Walking Through Every Single Move
First, preheat your oven to 400°F (200°C). Line a baking sheet with parchment paper or silicone mat so nothing sticks later.
Now, mix together in a small bowl the nutritional yeast, onion flakes, garlic powder, parsley, thyme, salt, and turmeric. This seasoning blend gonna take your chicken to flavor town.
Slice the chicken breasts into 1-inch wide strips. If you spot uneven pieces, don't sweat it, they still cook great.
In another bowl, whisk together mayo and egg until smooth. Sprinkle in your salt and pepper for extra taste.
Dip each chicken tender into this mayo-egg mixture so it gets coated just right. Then roll or coat each piece with the seasoning blend. Make sure every bit gets covered.
Place your coated tenders spaced out evenly on the baking sheet. You don't want them crowded or they won't crisp up good.
Bake those beauties for 25 to 30 minutes, flipping halfway through. When they're golden and cooked through, set them aside to rest a little before you chow down.
Valve Hacks You Need to Know
- Make sure the sealing ring is clean and properly set or the pressure won't build right.
- Watch the broth depth carefully; you only need about a cup or less for this recipe so keep it low to prevent sogginess.
- Use slow release after cooking to hold in juices longer and avoid tough chicken.
- Pay attention to steam cues after pressure is up; a steady hiss means it's working, but if it's wild steam it might be too hot.
The Flavor Experience Waiting for You
The moment you bite into these tenders you're hit with a crispy outside that snaps just right. It's crunchy but not hard or burnt, just perfect texture that makes you wanna chew slow.
Inside is juicy and tender, the pressure cooker doesn't let the chicken dry out at all. You remember that mayo and egg kept things moist while the seasoning blend sneaks in flavors deep into the meat.
The herbs give this a kinda fresh vibe, nothing overpowering but just enough to keep you guessing and loving each bite. The nutritional yeast adds a mild cheesy taste without dairy hassles.
All these flavors get balanced between crisp, juicy, and healthy making for tenders you can feel good about eating any day of the week. You won't miss regular breaded ones once you try this.

Smart Storage That Actually Works
Store leftover chicken tenders in an airtight container in the fridge. They'll last about 3 to 4 days and still taste dang good reheated.
If you wanna freeze them, flash freeze by laying the tenders on a tray first so they don't stick together. Then toss them in a freezer safe bag. When you pull them out later, thaw in fridge overnight.
For reheating, you can use the oven or toaster oven at 375°F to bring that crisp back. Just 10-15 minutes should do it real good. Microwave works too but you might lose some crispiness.
Common Questions and Real Answers
- Can I use chicken thighs instead of breasts? Yeah, you can. But thighs take a bit longer because they're thicker and fattier. Watch your cooking time and maybe do a quick natural release to keep them tender.
- What's the best gluten free bread crumb? I love homemade Panko style for the crunch. Store bought works too but just check ingredients to avoid any gums or fillers.
- Is mayo necessary in the coating? It really helps hold moisture and makes the seasoning stick better. You can swap for Greek yogurt if you wanna switch it up.
- Can I skip the oven step? You could, but these get crispier with the bake finish. Try broiling a bit if you wanna shortcut it.
- How do I know when the chicken's done? Internal temp should hit 165°F. You can use a quick meat thermometer to check or cut one tender to peek.
- What if I forget to do natural release? Quick release is okay but might dry out your chicken a bit more. Natural release lets it finish gently for juicier tenders.
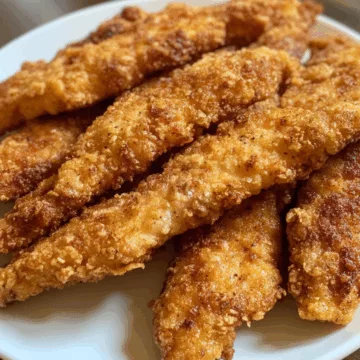
Easy Gluten Free Chicken Tenders (Crispy, Juicy, & Healthy!)
Equipment
- 1 Baking sheet lined with parchment
- 1 Mixing bowl for seasoning and batter
- 1 Oven preheated to 400°F
Ingredients
Bouillon Seasoning Mix
- 4 ½ teaspoons Nutritional yeast flakes
- 1 teaspoon Dried onion flakes or ½ teaspoon onion powder
- ¼ teaspoon Garlic powder
- ¼ teaspoon Dried parsley
- ¼ teaspoon Dried thyme
- ⅛ teaspoon Kosher salt
- ⅛ teaspoon Turmeric
Chicken and Coating
- 1 ½ pounds Chicken breasts skinless, boneless, sliced
- 3 tablespoons Mayonnaise
- 1 Egg any size
- ¼ teaspoon Kosher salt for batter
- ⅛ teaspoon Black pepper fresh ground
- ¼ cup Superfine white rice flour or gum-free gluten free blend
- 2 to 3 cups Gluten free Panko style bread crumbs homemade or store-bought
- Cooking oil spray
Instructions
Instructions
- Preheat oven to 400°F and line a baking sheet with parchment or silicone mat.
- Mix nutritional yeast, onion flakes, garlic powder, parsley, thyme, salt, and turmeric in a small bowl.
- Slice chicken breasts into 1-inch wide tenders.
- In another bowl, whisk mayo and egg. Add salt and pepper.
- Dip chicken tenders in mayo-egg mix, then coat with seasoning blend.
- Arrange tenders on baking sheet without overlapping.
- Bake for 25 to 30 minutes, flipping halfway through.
- Remove, let rest briefly, and serve warm.