The pot lid rattles and you know dinner is almost ready. You catch that sound and feel this little thrill 'cause something good's coming your way. There's the hiss from the valve, building that pressure inside, and you just wait for the moment when the float valve pops up telling you it's cooking right.

You notice the smell from the sealing ring letting out hints of spices and turkey that's gonna be rich and filling. It's that kind of smell that's got you recalling cozy nights and belly-warming meals. The broth depth inside the pot thickens as the heat does its thing and you just know it's gonna be damn good.
You feel the kinda excitement that comes when you're close to eating but also wanna let those flavors really unlock. The lifting float valve makes you wanna peek but nah, you gotta trust the pressure build doing its work till the timer says go. Soon enough, you're gonna be scooping up thick, hearty chili straight from the pot.
The Truth About Fast Tender Results
- Pressure cookers build up intense steam pressure quickly, making tough turkey and beans tender in no time. This technique is similar to the quick cooking methods I've shared in my Stuffed Pepper Soup recipe.
- The sealing ring keeps everything locked tight, so no flavor escapes and your chili stays juicy, comparable to how it locks in flavor for my Slow Cooker Garlic Butter Beef Bites & Potatoes.
- The float valve shows when full pressure is reached and helps you know when cooking starts.
- Valve hiss is your hint that the pot's got steady pressure, the sign you trust your timer on.
- Broth depth matters-enough liquid to cook but not so much to make chili watery.
- Using the right pressure setting fastens cooking, but low pressure works if you wanna simmer gently after.
- Quick release or natural pressure release affects texture, giving you control over how thick your chili ends up.
Everything You Need Lined Up
- 3 tablespoons olive oil
- 1 large yellow onion, diced
- 2 bell peppers, diced
- 2 pounds 93% lean ground turkey
- 8 cloves garlic, finely chopped
- 3-4 chipotle peppers from the can packed in adobo, chopped
- 3 tablespoons chili powder (check notes for your fave blend)
- 1 tablespoon ground cumin
- 1 tablespoon dried oregano
- 1 tablespoon smoked paprika
- 1 teaspoon garlic powder
- 1 teaspoon onion powder
- ½ teaspoon ground cinnamon
- 12 ounces beer of your choice
- One 16-ounce can tomato sauce
- Two 10-ounce cans diced tomatoes with green chilies
- Three 15-ounce cans beans (black, pinto, kidney), drained and rinsed
- Optional: up to 1 cup chicken stock or broth, or water
- 1 lime, juiced
- Kosher salt and ground black pepper for seasoning
You wanna get everything prepped and within arm's reach before you start. That way you keep your flow going and don't have to dig around mid-cook. Prep the onion and peppers first, that way you're ready to toss 'em into olive oil quick and start softening those flavors.
Got your turkey browned and spices ready? Make sure your chipotle is finely chopped to spread that smoky heat throughout. The beans need a good rinse or your chili might get kinda starchy or thick in weird ways. The broth or beer adds that body and depth you want in your chili, so don't skip it!

How It All Comes Together Step by Step
Step one: Heat your olive oil in your big pot or Dutch oven on medium heat. Toss in your diced onion and bell peppers. You're sautéing till they soften, about 5 or 6 minutes, and you wanna keep an eye so they don't brown too fast.
Step two: Add your ground turkey. Break it up with your spoon while letting it cook for 7 to 8 minutes. You wanna see it nice and browned 'cause that adds serious flavor to your chili base.
Step three: Stir in your garlic, chipotle peppers, chili powder, cumin, oregano, and smoked paprika. Keep the heat just right and cook these with the turkey for 1 to 2 minutes till they get fragrant and you can smell all those spices waking up.
Step four: Pour in your tomato sauce, canned diced tomatoes with chilies, and your beans. If you're using that optional broth or water, add it here. Then slowly add your beer of choice. Stir everything till it's all combined and you feel that thick chili goodness coming together.
Step five: Now seal your pressure cooker lid tight, making sure your sealing ring is in place for a good seal. Turn up to high pressure and wait for that float valve to pop up indicating full pressure. Once you get valve hiss, start timing your cook for about 15 minutes.
Step six: When cooking's done, let pressure release naturally for about 10 minutes if you wanna thicker chili. After that, quick release remaining pressure by carefully opening the valve. Lift the lid and give the chili a good stir. Squeeze in that lime juice and taste. Add salt and pepper as you want and serve up.
Valve Hacks You Need to Know
- If you're in a hurry, quick release helps, but be ready for some steam bursts so keep hands and face clear.
- Natural pressure release takes longer, but lets chili thicken and flavors settle better-it works real good when you're not in a big rush.
- Stuck float valve? Gently turn the pressure regulator or wiggle the sealing ring to make sure it's clean and seating right before cooking.
The Flavor Experience Waiting for You
You catch the first spoonful and it's thick, hearty, and just falls apart on your tongue. The turkey is tender but packed with that smoky, spicy punch from the chipotle peppers. You notice how the beans mix in, giving you satisfying bites and body.
There's a richness from the beer that kinda lifts the tomato and chili base. It's subtle but that layer of flavor makes your chili stand apart from the usual. The spices blend perfectly, not too hot but just that right kick that warms you up.
The lime juice at the end gives a fresh tangy contrast that brightens every bite. It's like a little pep that makes you wanna go in for seconds. The whole thing sticks to your ribs but keeps you feeling comfy, not heavy.
When you eat this chili, you feel all those flavors and textures roll together. It's your kinda dinner that hugs you warm after a long day, the sorta meal you'll remember and wanna make again soon.

Keeping Leftovers Fresh and Ready
First up, fridge storage works great for leftovers. Pop your chili into airtight containers and it keeps well for about 4 to 5 days. Just reheat on the stove or microwave, stirring occasionally so it heats evenly.
If you wanna save it longer, freezing is a top choice. Divide chili into portions before freezing to make reheating easier. Use heavy-duty freezer bags or containers and you're set for up to 3 months. Thaw overnight in fridge or reheat from frozen with care.
Another neat trick is freezing it in ice cube trays. Once frozen, transfer those cubes to bags. These little bites thaw quick for a small snack or quick addition to rice or nachos when you need a hit of chili flavor fast.
Your Most Asked Questions Answered
- Can I use ground beef instead of turkey? Yeah, that works perfectly. Just follow the same steps but remember beef might release more fat. Check out tips in my Stuffed Pepper Soup recipe for beef handling.
- What's the best beer to use? I like darker ales or amber beers 'cause they add good depth. But really, use what you like drinking!
- Can I make this chili vegetarian? Swap turkey for plant-based crumbles and veggie broth. Beans and peppers still make it hearty.
- Why's my chili watery? You might've added too much broth or didn't do natural pressure release. Letting it sit longer with lid off after cooking helps thicken it up.
- How spicy is this chili? It's got a nice kick from chipotle but you can adjust peppers to your heat level. Less chipotle for mild, more if you like fiery.
- Can I double the recipe in my pressure cooker? You can but watch broth depth so it's not too full. Also, cooking time might be just a bit longer but usually similar.
Suggested Related Recipes to Explore
- Try the flavorful Stuffed Pepper Soup for another comforting, hearty meal with a rich broth base.
- Check out the Slow Cooker Garlic Butter Beef Bites & Potatoes if you want a hands-off dinner that comes out tender and delicious.
- For a cozy yet sweet finish, the delightful Banana Bliss Cheesecake makes the perfect dessert option.
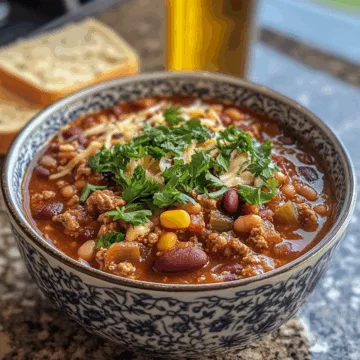
Damn Good Turkey Chili with Beans & Beer (Thick & Hearty!)
Equipment
- 1 Pressure cooker or Dutch oven
Ingredients
Ingredients
- 3 tablespoons olive oil
- 1 large yellow onion diced
- 2 bell peppers diced
- 2 pounds 93% lean ground turkey
- 8 cloves garlic finely chopped
- 3–4 chipotle peppers from can in adobo, chopped
- 3 tablespoons chili powder use your favorite blend
- 1 tablespoon ground cumin
- 1 tablespoon dried oregano
- 1 tablespoon smoked paprika
- 1 teaspoon garlic powder
- 1 teaspoon onion powder
- 0.5 teaspoon ground cinnamon
- 12 ounces beer of your choice
- 16 ounces tomato sauce 1 can
- 20 ounces diced tomatoes with green chilies 2 cans
- 45 ounces beans black, pinto, kidney; drained and rinsed
- 1 cup chicken stock or broth or water optional, use up to 1 cup
- 1 lime juiced
- Kosher salt and ground black pepper to taste
Instructions
Instructions
- Heat olive oil in a large pot or Dutch oven over medium heat. Add diced onion and bell peppers and sauté for 5-6 minutes until softened.
- Add ground turkey and cook for 7–8 minutes, breaking it up with a spoon and browning it.
- Stir in garlic, chipotle peppers, chili powder, cumin, oregano, and smoked paprika. Cook for 1–2 minutes until fragrant.
- Pour in tomato sauce, diced tomatoes with chilies, and beans. Add optional broth/water and slowly stir in beer. Stir until well combined.
- Seal the pressure cooker, ensuring the sealing ring is in place. Cook on high pressure for 15 minutes once float valve pops up.
- Let pressure release naturally for 10 minutes, then quick release remaining pressure. Open lid and stir chili.
- Stir in lime juice, season with salt and pepper to taste, and serve warm.