
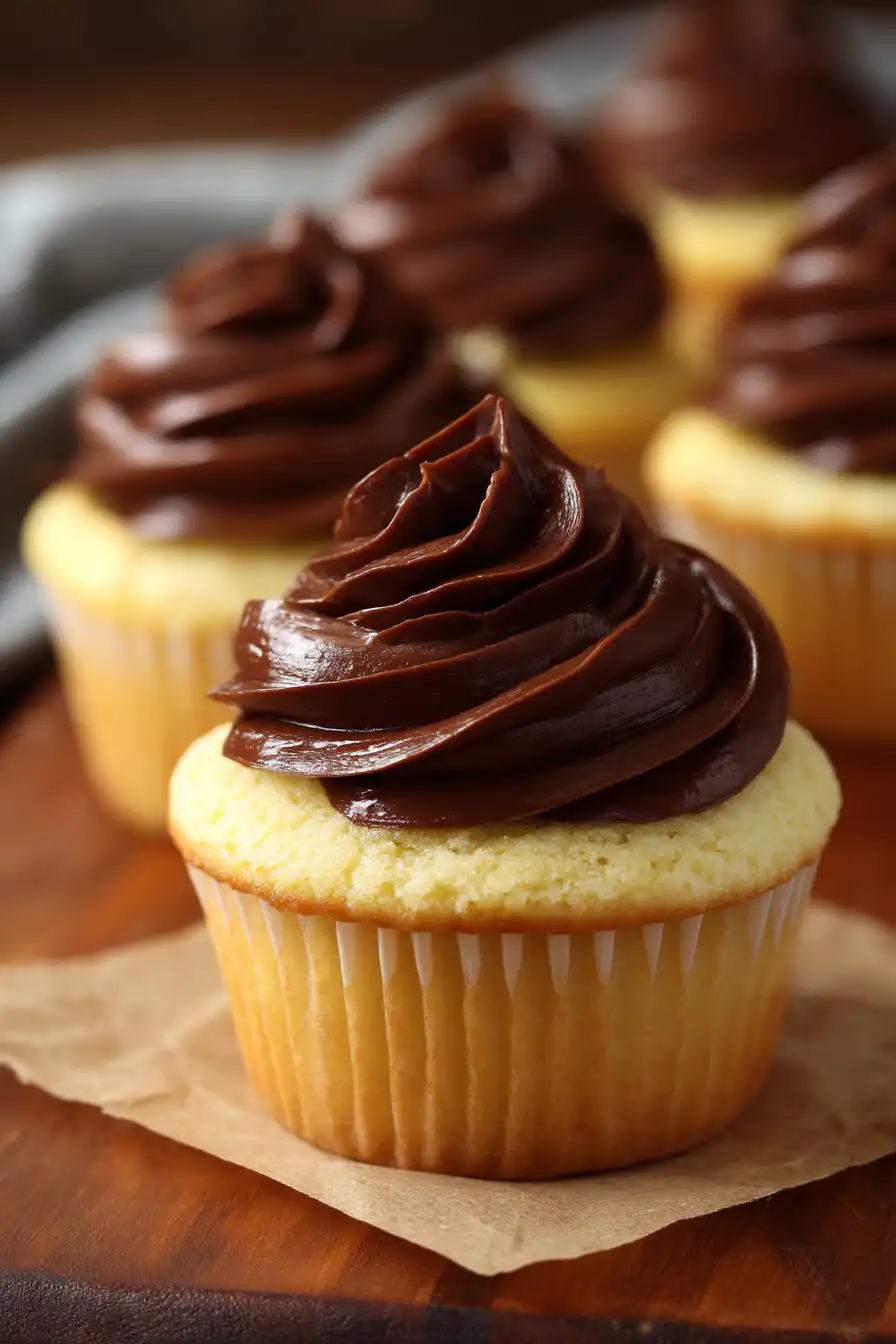
Boston Cream Cupcakes are a fun twist on the classic Boston Cream Pie, offering the same yummy flavors in a small, easy-to-eat form. These treats consist of a soft vanilla cupcake with a rich pastry cream filling, all covered with a smooth chocolate ganache. The mix of vanilla, chocolate, and creamy filling gives you a dessert that many find just really irresistible, similar to our no-bake cookie dough cheesecake bars.
Boston Cream Pie, which is thought to have been started in Boston back in the late 1800s, is an old favorite that has changed a lot over the years. One of the coolest changes is switching it up into a cupcake. This change shows how much people's tastes can shift. These cupcakes stick with the original pie's tradition but also let you enjoy the tasty flavor in a more convenient and shareable way. Over time, different versions of the classic recipe popped up, including sleek layer cakes like our berry velvet layer cake.
The goal of this article is to be a complete guide for Boston Cream Cupcakes. We talk about its history, what each part of the cupcake is made up of, and we even give you a detailed recipe with important baking hints. Plus, we answer some common questions so that beginners and more experienced bakers both feel okay making these yummy cupcakes at home.
1. History of Boston Cream Cupcakes
Boston Cream Pie, which gave birth to the Boston Cream Cupcakes, has a long history that goes back to the late 1800s in Boston. It is often credited to the Parker House Hotel and was created by a French chef. At first, it was made with layers of sponge cake filled with pastry cream and topped with a chocolate glaze. This dessert quickly became a fancy treat that many people loved for its unique mix of flavors and textures.
As cooking styles changed, so did the way people made Boston Cream Pie. Instead of a pie, its layers were turned into a more portable form - a cupcake. This change reflects how people started wanting both convenience and great flavor. The Boston Cream Cupcake came about as a tasty alternative, letting fans of the original pie have bite-sized treats. With cupcakes becoming super popular in the 21st century, different versions of the classic recipe popped up and the Boston Cream Cupcake earned a special place in many hearts (and tummies).
2. Understanding Boston Cream Cupcakes
Boston Cream Cupcakes are a mix of several yummy parts: a light vanilla cupcake, a thick pastry cream filling, and a rich chocolate ganache topping. The vanilla cupcake makes a good base for the creamy filling and the decadent ganache to shine. Each cupcake is baked until it's golden, giving it a soft texture that goes great with the cream inside. After being filled, they get a generous topping of velvet-smooth chocolate ganache that makes everything taste even better.
The taste of Boston Cream Cupcakes is a balance between sweet and rich. The vanilla cupcake is lightly sweet and works really well with the custard-like filling that is bursting with vanilla flavor. This is all finished off with the deep, intense taste of chocolate ganache, making a dessert experience that is both over the top and satisfying. This mix of flavors and textures not only reminds you of the original Boston Cream Pie but also makes these cupcakes more fun and practical for any kind of event. If you enjoy creative cupcake flavors, you might also love our lemon cupcakes with raspberry buttercream frosting.

3. Detailed Recipe for Boston Cream Cupcakes
3.1 Ingredients
- Cupcakes:
- 1 ½ cups all-purpose flour
- 1 cup granulated sugar
- ½ cup unsalted butter, softened
- 2 large eggs
- ½ cup milk
- 2 teaspoon baking powder
- 1 teaspoon vanilla extract
- ½ teaspoon salt
- Pastry Cream Filling:
- 2 cups whole milk
- ½ cup granulated sugar
- 4 large egg yolks
- 3 tablespoon cornstarch
- 2 teaspoon vanilla extract
- Chocolate Ganache:
- 1 cup heavy cream
- 8 oz semi-sweet chocolate, chopped
3.2 Directions
Step 1: Making the Cupcakes
Preheat your oven to 350°F (175°C). In a bowl, mix together the flour, baking powder, and salt. In another bowl, beat the softened butter and sugar until its light and kinda fluffy. Then add the eggs one by one, mixing well after each egg. Slowly mix in the milk and vanilla extract. Next, stir in the dry ingredients until there are no lumps left. Put the batter evenly in a lined cupcake tin and bake for 18-20 minutes, or until a toothpick poked in the center comes out clean. Let them cool completely.
Step 2: Preparing the Pastry Cream
In a medium saucepan, heat the whole milk over medium heat until it starts to steam. In another bowl, whisk the sugar, egg yolks, cornstarch, and vanilla extract until well mixed. Slowly add the hot milk to the egg mix, whisking all the time so the eggs dont scramble. Pour the mix back into the saucepan and cook it over medium heat, stirring constantly until it thickens. When it gets thick, move it into a bowl, cover with plastic wrap placed right on the surface, and cool it completely in the fridge.
Step 3: Making the Ganache
In a small saucepan, heat the heavy cream over medium heat until it starts to simmer. Then, take it off the heat and pour it over the chopped chocolate in a heatproof bowl. Let it sit for a few minutes then stir it until its smooth and shiny. Allow it to cool a little before using.
Step 4: Assembling the Cupcakes
After the cupcakes have cooled, use a small knife or cupcake corer to take out the center of each one. Fill the hole with the pastry cream until it's full. Then, either drizzle or dip the top of each cupcake in the chocolate ganache, letting the extra drip off. Let the ganache set before you serve them.
3.3 Tips and Advice
- For the best result, make sure all your ingredients are at room temperature before you start mixing, it helps to get a more even batter.
- You can use gluten-free flour if you need to, so they are good for people who are gluten-sensitive.
- For a dairy-free option, swap out the butter with a plant-based alternative and use almond or oat milk.
- Store the cupcakes in an airtight container at room temperature for up to 2 days or in the fridge for up to a week. If you want, freeze them for even longer storage.
4. Variations on Boston Cream Cupcakes
4.1 Flavor Variations
Even though the classic Boston Cream Cupcake is a big hit, you can try out different flavors too. If you want a chocolatey version, use chocolate cupcake batter instead of vanilla. You can also add spices like cinnamon or nutmeg for a twist. For a chocolate-hazelnut approach, consider our Nutella cookie pie. Try using different extracts like almond or orange in the pastry cream for a new take on the classic flavor.
4.2 Dietary Adaptations
To fit different diets, you may try using a gluten-free flour blend when making Boston Cream Cupcakes. For vegan alternatives, use flax eggs (mix 1 tablespoon of ground flaxseed with 3 tablespoons of water for each egg), plant-based butter, and non-dairy milk. Also, you can swap the pastry cream for a coconut cream filling and use dairy-free chocolate for the ganache.
4.3 Presentation Ideas
Make your Boston Cream Cupcakes look even more fun by adding cool toppings. You could sprinkle crushed nuts, drizzle caramel sauce, or add some fresh berries on top to give them a pop of color. Using colorful cupcake liners and a piping bag to make pretty ganache swirls can really make them stand out. For special events, put the cupcakes in decorative boxes or arrange them on a nice platter to wow your guests.
5. Pairing and Serving Suggestions
5.1 Best Beverage Pairings
Boston Cream Cupcakes go great with many drinks. A cup of freshly brewed coffee really brings out the rich flavors, while a cup of tea gives a lighter pairing. For an extra fancy treat, serve them with a glass of dessert wine which makes the chocolate flavors pop. Or, a tall glass of cold milk is always a classic choice, fun for kids and those feelin nostalgic too. For a seasonal twist, serve alongside our apple cider cheesecake for a fall-themed dessert spread.
5.2 Occasions for Serving
These cupcakes are super versatile, and good for all sorts of events. They work great for birthday parties, weddings, holidays, or even family get-togethers. Because they come in individual servings, they are simple to serve at casual parties, but they also look classy enough for fancier events.
6. Frequently Asked Questions (FAQs)
6.1 What's the difference between Boston Cream Pie and Boston Cream Cupcakes?
The main difference is in their shape and how you eat them. Boston Cream Pie is a layered dessert with sponge cake, pastry cream, and chocolate glaze that is usually cut into slices. The cupcakes take the same flavors and pack them into a single, handheld treat that's easier to share and eat on the go.
6.2 How do I prevent my cupcakes from sinking?
To stop your cupcakes from sinking, make sure you measure all your ingredients correctly. Don't overmix the batter, because that can add too much air and then they may sink when they cool down. Also, check your baking powder to be sure it's not expired since old leavening agents wont get the cupcakes to rise properly.
6.3 Can you freeze Boston Cream Cupcakes?
Yes, you can freeze Boston Cream Cupcakes for later. First, make sure the ganache is set before freezing. Wrap each cupcake tight in plastic wrap, then foil for extra protection, and put them in an airtight container. They can be frozen for up to 3 months. To eat, thaw them in the fridge and let them come to room temperature.
6.4 How long will the cupcakes last?
Boston Cream Cupcakes can be kept at room temperature for up to 2 days. If you refrigerate them, they can last up to a week. Its best to eat them within this time so they stay fresh and yummy. Keep them in an airtight container so they dont dry out.
Conclusion
Boston Cream Cupcakes bring an amazing twist to a time-honored dessert. They mix rich flavors and a fancy look in a handy, bite-size treat. Whether you are making them for a special event or just wanting a sweet snack, these cupcakes are sure to hit the spot. Try out the recipe, experiment with different twists, and share your tasty creations with your friends and family!

Boston Cream Cupcakes
Equipment
- 1 muffin tin
- 12 cupcake liners
- 2 mixing bowls
- 1 electric mixer (or whisk)
- 1 saucepan
- 1 heatproof spatula
- 1 measuring cups and spoons
- 1 whisk
Ingredients
- 1 ½ cups all-purpose flour
- 1 cup granulated sugar
- ½ cup unsalted butter, softened
- 2 large eggs
- ½ cup milk
- 2 teaspoons baking powder
- 1 teaspoon vanilla extract
- ¼ teaspoon salt
- 1 cup whole milk
- 3 large egg yolks
- ¼ cup granulated sugar
- 2 tablespoons cornstarch
- 1 tablespoon unsalted butter
- 1 teaspoon vanilla extract
- 6 oz semi-sweet chocolate, chopped
- ½ cup heavy cream
Instructions
- Preheat the oven to 350°F (175°C). Line a muffin tin with cupcake liners.
- In a large bowl, cream together the softened butter and sugar until light and fluffy. Add the eggs one at a time, mixing well after each addition. Stir in the milk and vanilla extract.
- In a separate bowl, whisk together the flour, baking powder, and salt. Gradually add the dry ingredients to the wet mixture, mixing just until combined.
- Divide the batter evenly among the cupcake liners, filling each about ⅔ full. Bake for 18-20 minutes, or until a toothpick inserted into the center comes out clean. Allow them to cool completely.
- While the cupcakes cool, prepare the pastry cream. In a saucepan, heat the milk over medium heat until it begins to simmer. In a bowl, whisk together the egg yolks, sugar, and cornstarch until well combined.
- Slowly whisk in the hot milk mixture into the egg mixture to temper the eggs, then return the combined mixture to the saucepan. Cook over medium heat, whisking constantly until the mixture thickens (about 2-3 minutes). Remove from heat and stir in butter and vanilla extract. Allow the pastry cream to cool.
- To make the chocolate ganache, heat the heavy cream in a saucepan until it just begins to simmer. Pour it over the chopped chocolate in a bowl and let it sit for 5 minutes. Stir until smooth and glossy.
- Once the cupcakes are completely cool, use a small knife or cupcake corer to remove a small section from the top of each cupcake. Fill the center with the cooled pastry cream.
- Dip the tops of the filled cupcakes in the chocolate ganache, allowing any excess to drip off.
- Let the ganache set for a few minutes before serving. Enjoy your delectable Boston Cream Cupcakes!