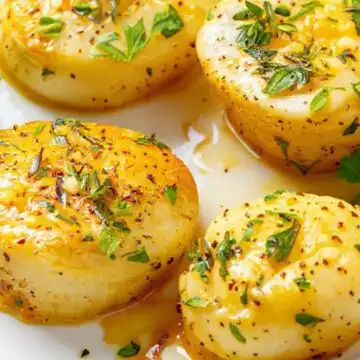
I've been chasing the memory of this Pan Seared Scallops (With Garlic Butter) dish ever since that rainy Tuesday night at a little coastal restaurant in Maine. The October chill had settled into my bones, and then that plate arrived. The golden crust cracked under my fork, revealing sweet, tender meat swimming in a nutty garlic butter sauce. This Pan-Seared Scallops with Garlic Butter is worth every step.
Look, I messed up this dish at least four times before I got it right. The first batch turned into rubbery hockey pucks. The second batch stuck to the pan like construction adhesive. But once I cracked the code, I realized the restaurant secret was embarrassingly simple. Let me walk you through it. Once you try this Pan-Seared Scallops with Garlic Butter, you'll make it again and again.
Pan-Seared Scallops With Garlic Butter: Setting the scene

That night in Bar Harbor, the waitress set down a cast iron skillet sizzling with butter and garlic. The smell hit me before the plate touched the table. Warm, pungent garlic mingling with that unmistakable ocean sweetness. I closed my eyes on the first bite. The secret to perfect Pan-Seared Scallops with Garlic Butter is simpler than you think.
The crust was paper-thin and caramelized. The inside barely held together, so tender it almost melted on my tongue. I remember thinking, "How do they get that crust without overcooking the middle?" Every restaurant version I tried at home came out pale and soggy, or tough and chewy.
Here's the thing. Most home cooks skip the most critical step. They don't dry the scallops nearly enough. They crowd the pan. They get impatient and fiddle with things. My Pan Seared Scallops (With Garlic Butter) recipe fixes all of that.

I finally nailed it on a December Sunday afternoon. The kitchen smelled like a five-star restaurant. My husband walked in and said, "Did you order takeout?" That's when I knew I'd cracked it.
Everything You Need
Let's talk scallops first. You want dry-packed sea scallops, not the wet-packed ones sitting in that milky liquid. Wet scallops have sodium tripolyphosphate added, which makes them hold water. That water ruins your crust. I learned this the hard way after spending $18 on a bag of scallops that turned into a poached mess in my skillet.

Fresh thyme and parsley make a difference here. Dried herbs have their place, but not in a 10-minute dish. You need that bright, fresh pop. And use salted butter. I know some recipes call for unsalted, but the salty butter helps season the scallops from the outside in as you baste them.
The lemon juice should be fresh. That bottled stuff tastes metallic and flat. You only need one tablespoon, so squeeze half a lemon. It's worth it for the bright acidity that cuts through the rich butter.
About the garlic. Two cloves sounds modest, but when you mash them into softened butter, the flavor spreads beautifully. Don't use a garlic press. Mince it fine by hand so you get tiny pieces that cook evenly without burning.
One more thing on the scallops themselves. If your grocery store only has frozen, that's fine. Just thaw them in the fridge overnight, not on the counter. Cold scallops sear better anyway.
The quick version
Start by making the compound butter. Mash the softened butter with lemon juice, garlic, thyme, and parsley in a small bowl. Don't worry if the lemon juice doesn't fully incorporate. It'll all come together in the pan.
Pat those scallops dry. I mean really dry. Get two layers of paper towels and press firmly. Season both sides with salt and pepper. I use a full teaspoon of sea salt for 16 scallops. That might sound like a lot, but most of it stays on the surface for the crust.
Heat your cast iron skillet over medium-high heat with olive oil until it shimmers. You want that oil almost smoking. Place the scallops in a single layer, leaving space between each one. If they touch, they'll steam instead of sear.
Here's the hardest part. Do not touch them for 2-3 minutes. Just stand there and watch. You'll see the edges turning golden brown. When you flip one and see that deep amber crust, you'll know you did it right.

Flip them and immediately add the garlic herb butter in pieces around the scallops. Tilt the pan slightly and use a spoon to baste the melting butter over the tops. Another 2-3 minutes and they're done. The whole process takes about 6 minutes.
My first time making this Pan Seared Scallops (With Garlic Butter), I got nervous and flipped one after 90 seconds. The crust was barely there. I left the rest for a full 2 minutes and 45 seconds. The difference was night and day.
My best advice
I've made this dish for dinner parties, date nights, and even a random Wednesday when I needed a win. Here's what I've learned.
Dry them like you mean it. Last February, I made this after a long day and skipped the second round of patting. Every scallop came out pale. You want them so dry they look matte, almost sticky. That's when you get the crust.
Don't skimp on the heat. Medium-high isn't a suggestion. If your pan isn't hot enough, the scallops release moisture before they brown. You hear that sad hissing sound, and you know you've lost the crust war.
Room temperature scallops. Take them out of the fridge 15 minutes before cooking. Cold scallops shocking a hot pan create steam. Steam is the enemy of a good sear.
Baste with purpose. When you add the butter, tilt the pan toward you so the butter pools, then spoon it over each scallop. Do this three or four times. It develops that nutty, browned butter flavor that makes this dish sing.
Why this actually works
This Pan Seared Scallops (With Garlic Butter) works because it respects the scallop's natural sweetness without overwhelming it. The high heat creates a Maillard reaction on the surface, that browning that gives you flavor compounds you can't get any other way.
The garlic butter serves two jobs. First, it adds richness and that savory depth. Second, it acts as a basting liquid that cooks the top of the scallop while the bottom sears. You get even cooking without having to flip more than once.
Here's the counterintuitive part. Most people think you need a nonstick pan for delicate seafood. You don't. A cast iron skillet holds heat much better and gives you that crust. Nonstick pans lose heat when you add cold scallops, and you end up steaming instead of searing.
I tested this with three different pans one weekend. Nonstick, stainless steel, and cast iron. The cast iron scallops had a crust twice as thick. The stainless steel ones stuck a little. The nonstick ones were pale and sad. Cast iron wins every time.
The timing also matters. At 2 minutes per side, you get a cooked-through center that's still tender. Go to 3 minutes and you're pushing into firm territory. I've found that 2 minutes and 30 seconds on the first side, then exactly 2 minutes after flipping, gives the sweet spot.
Meal Prep Notes
Scallops are best the day you cook them, hands down. The texture changes as they sit. But if you have leftovers, here's how to handle them.
Refrigerator
Store in an airtight container for up to 2 days. Place a paper towel in the bottom to absorb any moisture. Change the paper towel if it gets wet. This keeps the scallops from getting soggy.
Freezer
I don't recommend freezing cooked scallops. The texture gets rubbery when thawed. If you must, wrap each scallop individually in plastic wrap, then place in a freezer bag. Use within one month. Expect some texture loss.
Reheating
Reheat in a skillet over medium heat with a pat of butter. About 90 seconds per side. Don't microwave them. The microwave turns them into rubber bands. Trust me, I tried it once and threw the whole batch away.
One trick I use for leftover Pan Seared Scallops (With Garlic Butter). Slice them thin and toss them into a green salad with a lemon vinaigrette. The cold scallops work surprisingly well in salads the next day.
Where People Go Wrong
Don't buy pre-shucked frozen scallops in bags of water. Those have added phosphates that make them retain liquid. You'll never get a good sear. Spend the extra few dollars on dry-packed scallops from the seafood counter.
Don't rinse the scallops. I know this sounds counterintuitive, but rinsing adds moisture. Scallops come from the ocean. They're already clean. Just pat them dry. If you're worried about grit, check for the small side muscle and pull it off.
Don't move them around in the pan. Once those scallops hit the hot oil, leave them alone. Every time you slide them, you break the sear that's forming. I use a timer and literally step back from the stove so I'm not tempted.
Don't skip the side muscle. That little rectangular piece attached to the side of some scallops gets tough when cooked. Pinch it off before seasoning. It pulls right off with your fingers.
Before You Ask
Can I use frozen scallops for this Pan Seared Scallops (With Garlic Butter)?
Absolutely, but you need to thaw them properly. Put them in the refrigerator overnight. Never thaw scallops in warm water or the microwave. They release too much moisture and won't sear properly. Once thawed, pat them extra dry.
Why did my scallops stick to the pan?
Two likely reasons. Either your pan wasn't hot enough, or you tried to flip them too early. The scallops release naturally from the pan when the crust is fully formed. If they're sticking, give them another 30 seconds and try again.
Can I use dried herbs instead of fresh?
You can, but the flavor changes. Use half the amount of dried herbs since they're more concentrated. I'd skip the dried parsley entirely and just use dried thyme. The fresh herbs really make this Pan Seared Scallops (With Garlic Butter) shine though.
How do I know when scallops are done?
Look for the crust on both sides and a slightly opaque center. The scallop should feel firm but give slightly when pressed. Cut one open to check if you're unsure. The center should be just barely opaque with no raw translucency. Overcooked scallops turn opaque all the way through and get tough.
💡 Pro tip: Save the scallop shells if you buy them shell-on. Rinse them out and use them as pretty serving dishes for this Pan Seared Scallops (With Garlic Butter). It looks restaurant-fancy and costs nothing.
Pan Seared Scallops (With Garlic Butter)
Equipment
- Large cast iron skillet
- paper towels
- Small bowl
- Spatula
- tongs
- cutting board
- Chef's knife
Ingredients
- ═══ FOR THE GARLIC HERB BUTTER ═══
- 2 tablespoon Salted butter ((softened))
- 1 tablespoon Lemon juice
- 2 cloves Garlic ((minced))
- ½ tablespoon Fresh thyme ((leaves))
- ½ tablespoon Fresh parsley ((chopped))
- ═══ FOR THE SCALLOPS ═══
- 16 large Sea scallops ((thawed in the fridge if frozen; ~1 lb))
- 1 teaspoon Sea salt
- ¼ teaspoon Black pepper
- 1 tablespoon Olive oil
Instructions
- In a small bowl, mash together the softened butter, lemon juice, minced garlic, fresh thyme leaves, and fresh parsley. The lemon juice may not fully incorporate, but that's fine. Set the garlic herb butter aside.
- Pat the scallops dry thoroughly with paper towels. Season both sides evenly with sea salt and black pepper.
- Heat the olive oil in a large cast iron skillet over medium-high heat until shimmering. Keep the prepared garlic herb butter nearby.
- Place the scallops in the skillet in a single layer, ensuring they do not touch. Sear without moving for 2-3 minutes until a golden crust forms on the bottom.
- Flip the scallops and immediately add the garlic herb butter in pieces around the scallops. Continue searing for 2-3 more minutes, basting the scallops with the melted butter occasionally, until a crust forms on the other side and scallops are cooked through.
Notes
- Tip 1: For a better crust, ensure scallops are very dry before searing; use fresh paper towels to remove excess moisture.
- Tip 2: Store leftover cooked scallops in an airtight container in the refrigerator for up to 2 days. Reheat gently in a skillet.
- Tip 3: Substitute fresh thyme with ½ teaspoon dried thyme if fresh is unavailable, and use salted butter for best flavor.
- Tip 4: Save time by making the garlic herb butter ahead and refrigerating it; soften at room temperature before use.
- Tip 5: Pair these scallops with a crisp white wine like Sauvignon Blanc or a light pasta dish for a complete meal.